Click on the feature names in the list below to
see more information and an animated example of it
in action.
|
SL |
Sign Wizard Letter
|
| SS |
Sign Wizard Scribe |
| SA |
Sign Wizard Advantage |
| SG |
Sign Wizard Grand |
| SP |
Sign Wizard Pro |
| NW |
Neon Wizard Std |
| N+ |
Neon Wizard Plus |
| NP |
Neon Wizard Pro |
| |
|
Fonts and Text
|
| |
Direct Text Entry

This feature enables you to enter text directly in the layout, as opposed to using a separate dialog box. All of the text attributes are displayed and can be easily adjusted at any time.
Direct text entry saves time since you can see the text in your layout at all times. Even after you have made changes to the text characteristics, such as extend or italicize, you can go back and edit the text directly on screen.
|
SL |
SS |
SA |
SG |
SP |
NW |
N+ |
NP |
Text Editing Property Bar
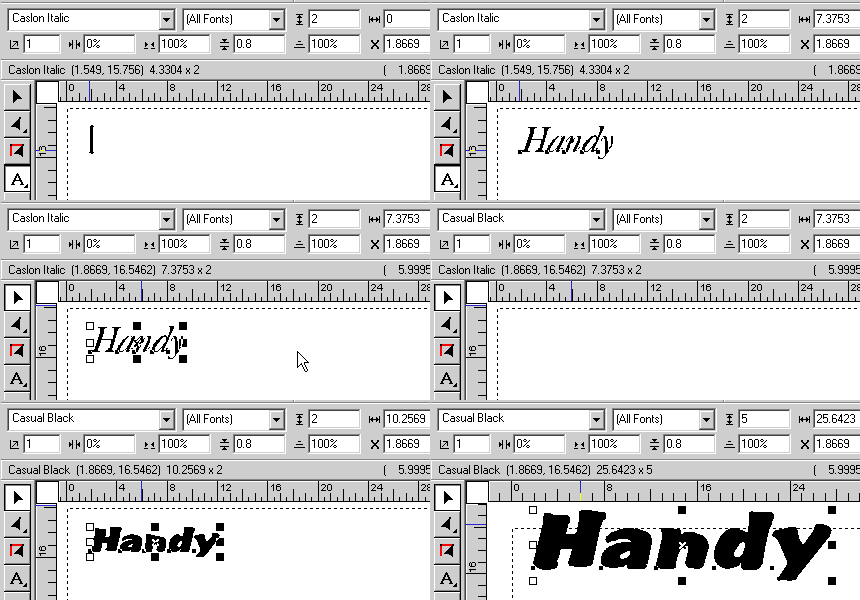
The extremely handy text property bar means the most common changes to your text are just a click away. While most changes can be done entirely with the mouse, sometimes you need to use specific values, such as a height. This is where you do that, and this bar is always there, whenever you have text selected.
We've had this feature since 1995, long before Adobe and others saw its merits.
|
SL |
SS |
SA |
SG |
SP |
NW |
N+ |
NP |
Auto Connecting Script Fonts
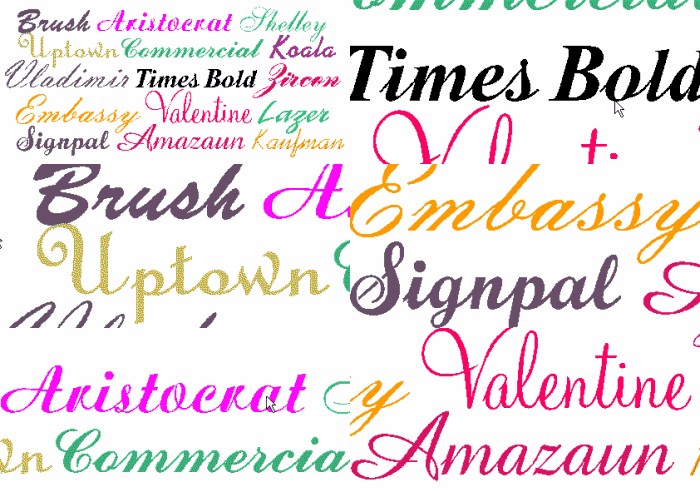
Sign Wizard and Neon Wizard have 15 connecting script fonts.
These specially designed fonts cover a wide range of styles from the casual looks of Brush Script and Lazer to the elegant styles of Zircon and Shelley to the ever popular Commercial Script.
|
SL |
SS |
SA |
SG |
SP |
NW |
N+ |
NP |
Individual Letter Spacing
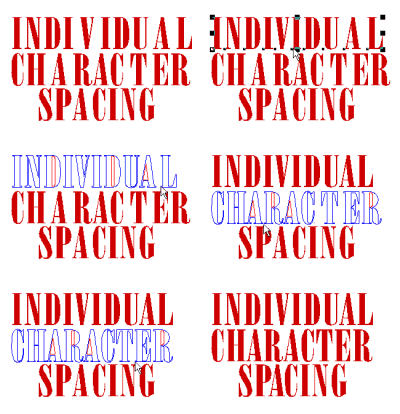
You can fine tune the spacing, or kerning, between individual letters without using a special tool. This makes it very quick and easy to create the perfect spacing between letters in a large sign.
This is now previewed in full color!
|
SL |
SS |
SA |
SG |
SP |
NW |
N+ |
NP |
Interactive Letter Spacing
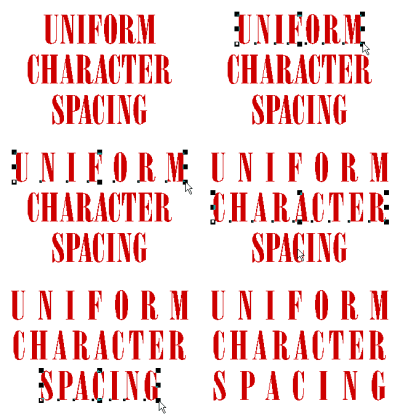
You can adjust the kerning of an entire line of text with a simple drag of the letter spacing handle, which is located on the lower left and lower right of the text objects.
This is now previewed in full color!
|
SL |
SS |
SA |
SG |
SP |
NW |
N+ |
NP |
Interactive Line Spacing
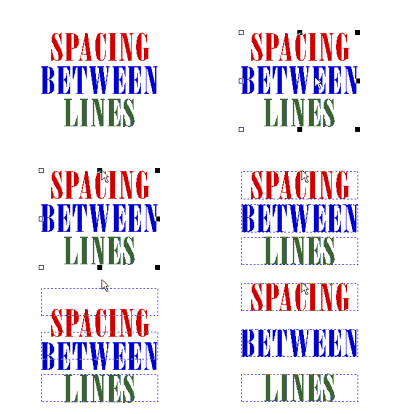
Adjust the spacing between lines interactively with the line spacing tool, which is available by using Shift when dragging a group of lines up or down.
|
SL |
SS |
SA |
SG |
SP |
NW |
N+ |
NP |
Interactive Rotating
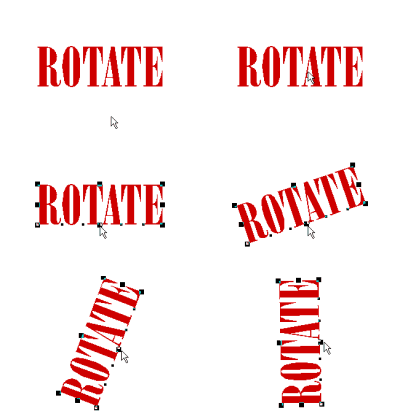
You can rotate text and graphics without using a special tool - the lower middle handle is the rotation tool. The angle of rotation is always shown in the property bar.
This is now previewed in full color!
|
SL |
SS |
SA |
SG |
SP |
NW |
N+ |
NP |
Interactive Scaling

Scale objects with just a drag of the mouse, and view it in real time, so you never have to guess if the size is right. The exact dimensions will be displayed in the property bar.
This is now previewed in full color!
|
SL |
SS |
SA |
SG |
SP |
NW |
N+ |
NP |
Interactive Slanting

You can quickly and easily slant, or italicize, text by simply dragging the top middle handle left or right. The angle of the slant is shown in the property bar.
This is now previewed in full color!
|
SL |
SS |
SA |
SG |
SP |
NW |
N+ |
NP |
Interactive Text on an Arc
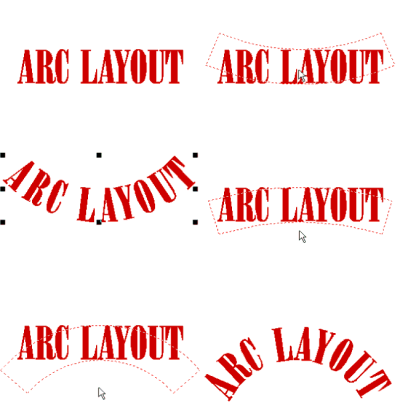
Creating text in an arc is a simple matter of holding the SHIFT key while dragging the middle bottom handle into the arc shape, either up or down.
|
SL |
SS |
SA |
SG |
SP |
NW |
N+ |
NP |
Interactive Word Spacing
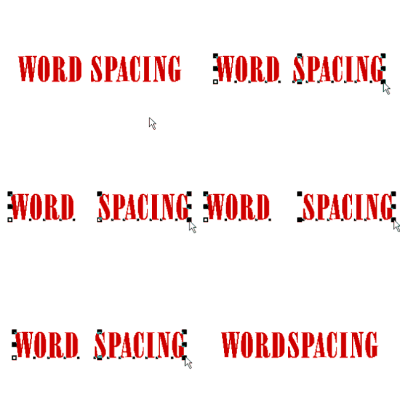
Interactive word spacing is a very handy way to adjust the kerning for the entire line of text at once.
|
SL |
SS |
SA |
SG |
SP |
NW |
N+ |
NP |
Neon Script Connecting Font

All versions of Neon Wizard come with a single tube connecting font called Neon Script. The lower case characters can be easily connected, giving you a clean and flowing single tube script.
|
|
|
|
|
|
NW |
N+ |
NP |
Real Time Spell Checking
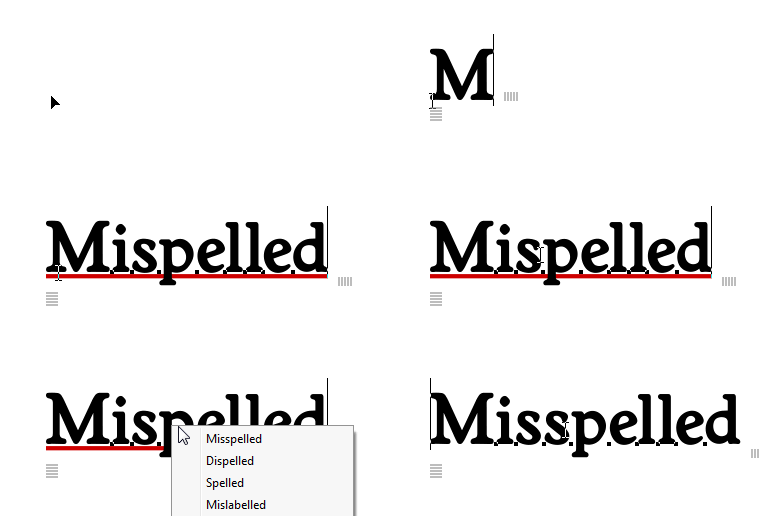
With Real Time Spell Checking, you always know if a word is misspelled without having to remember to run a spell check.
|
SL |
SS |
SA |
SG |
SP |
NW |
N+ |
NP |
Text Notes
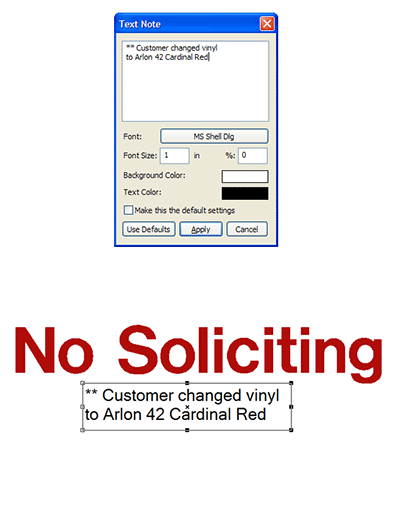
When you want to add notes to your layouts, perhaps for the production or installation department, use the new Text Notes feature. This will let you jot down the note and position it in your layout.
Using the Layers palette, you can then specify to print the notes with a proof copy, but not cut the notes as part of the actual job.
|
|
|
SA |
SG |
SP |
NW |
N+ |
NP |
WYSIWYG Font List
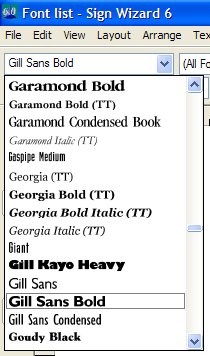
The font list shows exactly what the font looks like before you choose it! This is called WYSIWYG, "what you see is what you get." The complete font list contains 400 high quality signmaking fonts.
|
SL |
SS |
SA |
SG |
SP |
NW |
N+ |
NP |
Change Case

The ability to change the case of a line of text saves editing time and lets you see what the different options look like in a hurry. This feature lets you change from all lower case to ALL CAPS to First Letter Caps or to SMALL CAPS.
You may toggle through the four options by pressing Alt+C on the keyboard or you can use the Change Case function in the Text Menu. This is another easy to use text editing feature that helps you be creative and productive at the same time.
|
|
|
SA |
SG |
SP |
|
N+ |
NP |
Vertical Text

Aligning text vertically is one simple click of the mouse. All the text editing functions used for horizontal text editing - scaling, adjusting the spacing uniformly between characters, adjusting the spacing between two characters, slanting to the right and left, extending and condensing, heightening and rotating - are also available for vertical text.
|
|
|
|
SG |
SP |
|
N+ |
NP |
Font Wizard
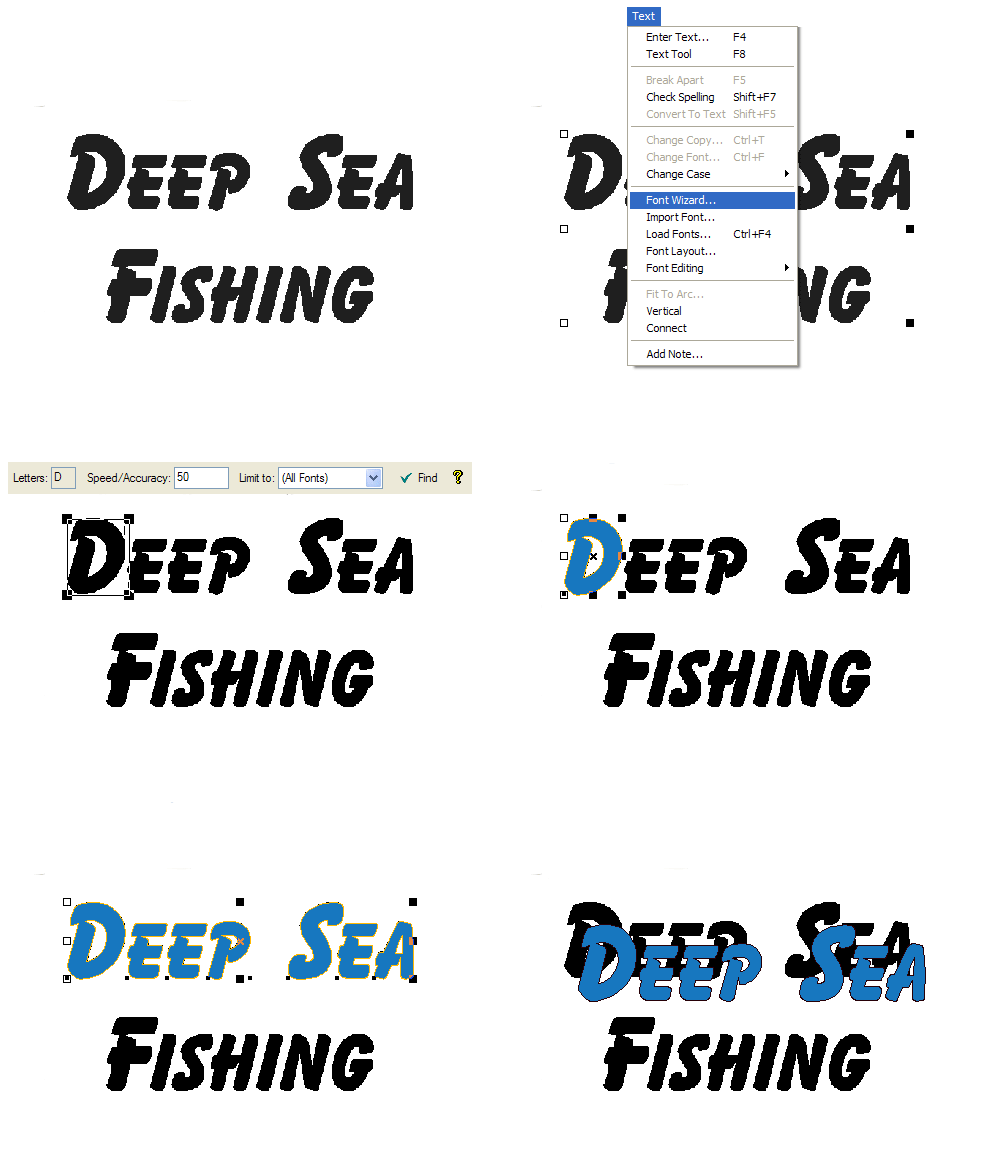
This huge time saving feature matches the font of scanned letters to a Sign Wizard font. So instead of vectorizing small text from a business card, just use Font Wizard to match the font, and then enter the text the easy way!
This "Deep Sea Fishing" example starts with a scanned bitmap. The first step is to select a character and type it in the Letters box - in our example, "D." Font Wizard then scans your font library for a match, and gives the top three results. It then places the font character on top of the bitmap so you can continue typing the rest of the text in a perfectly smooth vector format.
|
|
|
SA |
SG |
SP |
|
|
NP |
Design Tools
|
| |
Adjusting depth order
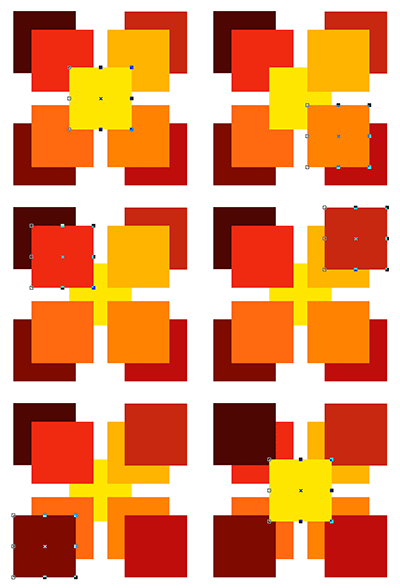
Ordering certain objects to be above or below other objects is an important design tool, and we have made it easy. Simply use the Page Up key to move an object on top and the Page Down key to move an object to the bottom. To move an object one level up, use the "+" key, and to move it one level down, use the "-" key.
These are standard conventions that you will be comfortable with from using other graphics programs.
|
SL |
SS |
SA |
SG |
SP |
NW |
N+ |
NP |
Adobe Type1 and OpenType font support
|
|
|
SA |
SG |
SP |
NW |
N+ |
NP |
Advanced, More Efficient Drawing Engine
|
SL |
SS |
SA |
SG |
SP |
NW |
N+ |
NP |
Alignment
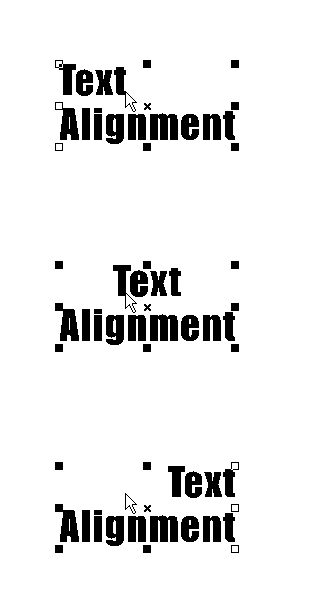
There are a number of alignment and centering tools for text and graphics to quickly get the design you want. For lines of text, you can align left, center, or right. The choice of alignment will determine the control point options and where the text will snap to guidelines or a grid.
For a group of objects, you can align them to the left, right, top, or bottom edge of the group. You can also align a group of objects or any individual object relative to the layout, such as vertical or horizontal center, or center of the layout.
These alignment and centering tools are excellent design aids, especially when working with shapes and graphics or designing custom logos.
|
SL |
SS |
SA |
SG |
SP |
NW |
N+ |
NP |
Align Two Objects without Guidelines with the Alt Key
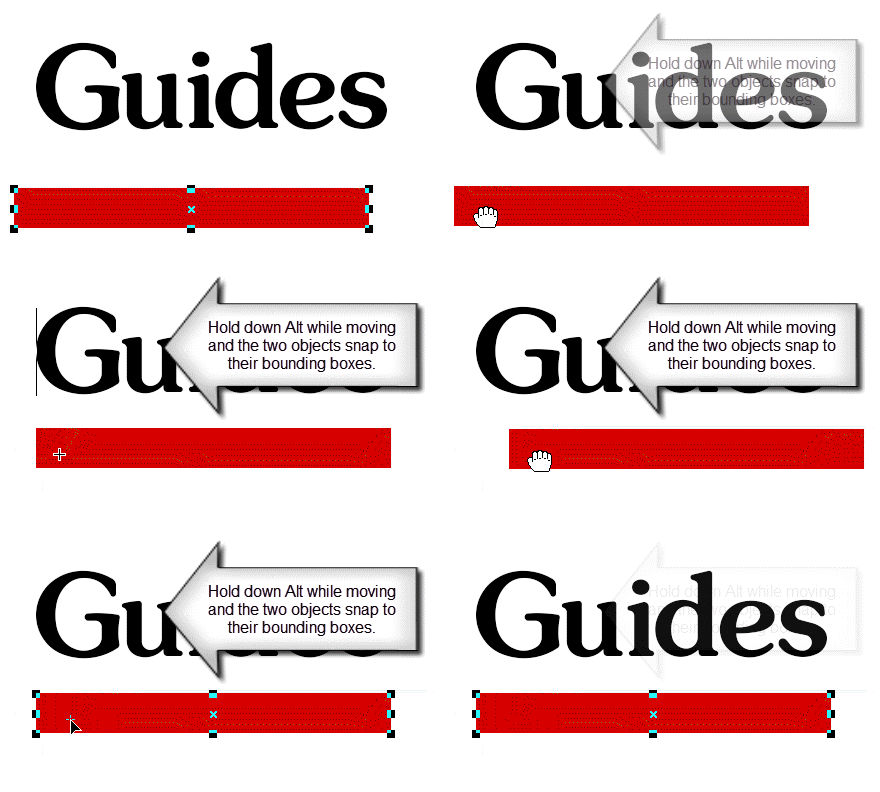
When you're moving a graphic and you need to align it with another graphic, there's a new, quicker way to do this, by simply holding down the Alt key when an edge of the graphic you're moving comes near the edge of another graphic in the layout.
|
SL |
SS |
SA |
SG |
SP |
NW |
N+ |
NP |
Alt Select Mode
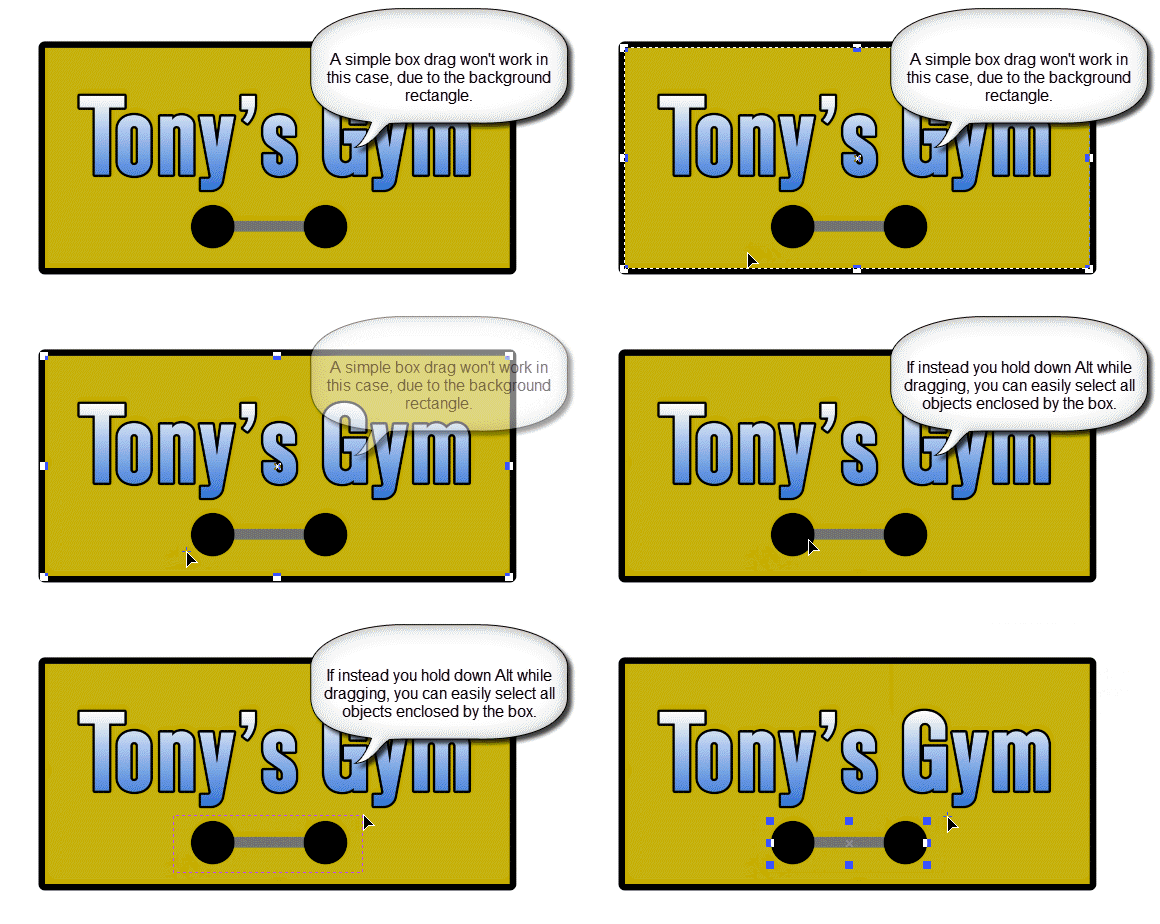
A great help when working with complex layouts is the new Alt select mode. Simply hold down Alt when selecting or group with a box and no matter where the cursor is, only objects that are enclosed by the box will be selected or grouped.
|
SL |
SS |
SA |
SG |
SP |
NW |
N+ |
NP |
Anchor Points

This is very handy for making precise numeric placements of graphics. You can now specify which of the 9 handles should be used as the reference point for the X and Y position values.
|
SL |
SS |
SA |
SG |
SP |
NW |
N+ |
NP |
Arrow Tool
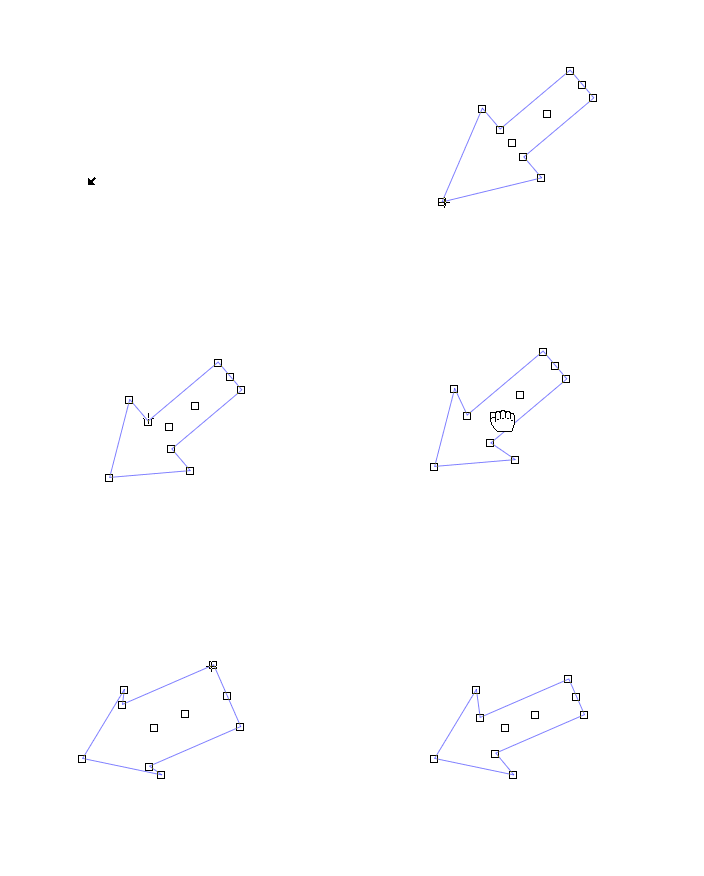
This handy tool lets you easily design arrows, giving you complete control over the shape.
For Version 7, the behavior of the handles has been improved to be more intuitive.
|
SL |
SS |
SA |
SG |
SP |
NW |
N+ |
NP |
Auto Square
|
SL |
SS |
SA |
SG |
SP |
NW |
N+ |
NP |
Border Tool
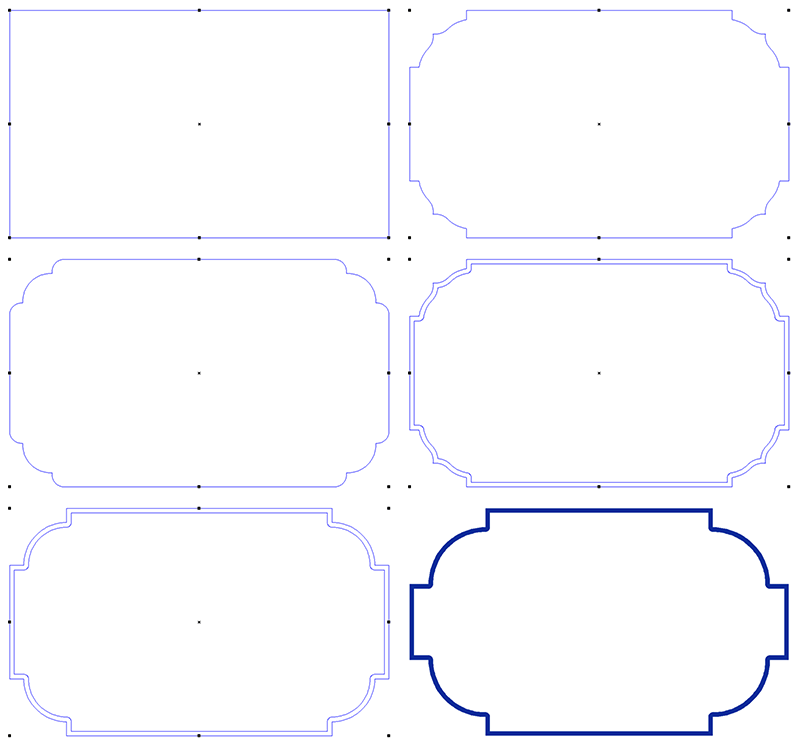
The Border Tool enables you to design custom borders with unique and saveable corners. It uses a property bar to manage the design and editing of the borders in version 6. These examples show how you can change the size and shape of the corners and add thickness to your borders.
|
|
|
SA |
SG |
SP |
NW |
N+ |
NP |
Break Into Outer Loops
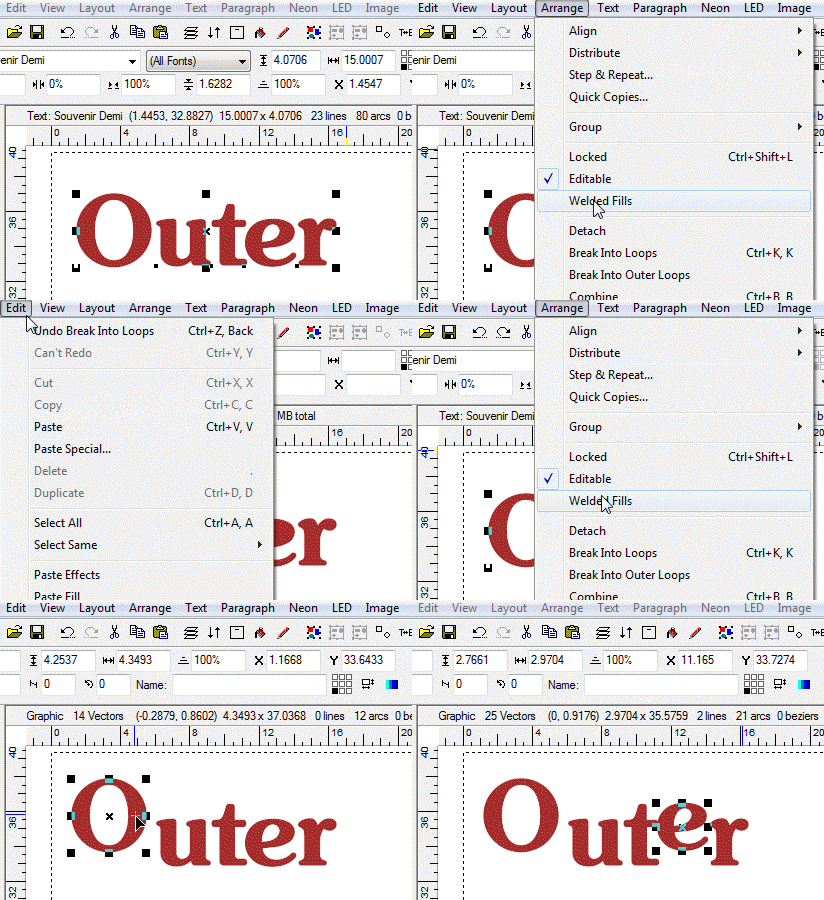
This command is similar to Break Into Loops, except it's smart and will recognize when an inner loop should be retained - usually with font letters.
|
SL |
SS |
SA |
SG |
SP |
NW |
N+ |
NP |
Color Management

Several standard color palettes are available with colors from popular vinyl suppliers. The color palette can be placed anywhere on the screen or as part of the top, right, bottom, or left toolbars.
If you want to create custom colors, you may create them with the Color Management dialog box shown here. You can even create an entirely new palette corresponding to the vinyl that you carry in stock.
|
SL |
SS |
SA |
SG |
SP |
NW |
N+ |
NP |
Color Palette Navigator

This feature of the Color Tab lists a color palette in a tall list, with a global navigation strip to its right, making finding the right color within the larger palette a snap - just click on the hue you want and the main list scrolls to that part of the palette.
|
SL |
SS |
SA |
SG |
SP |
NW |
N+ |
NP |
Common Shapes
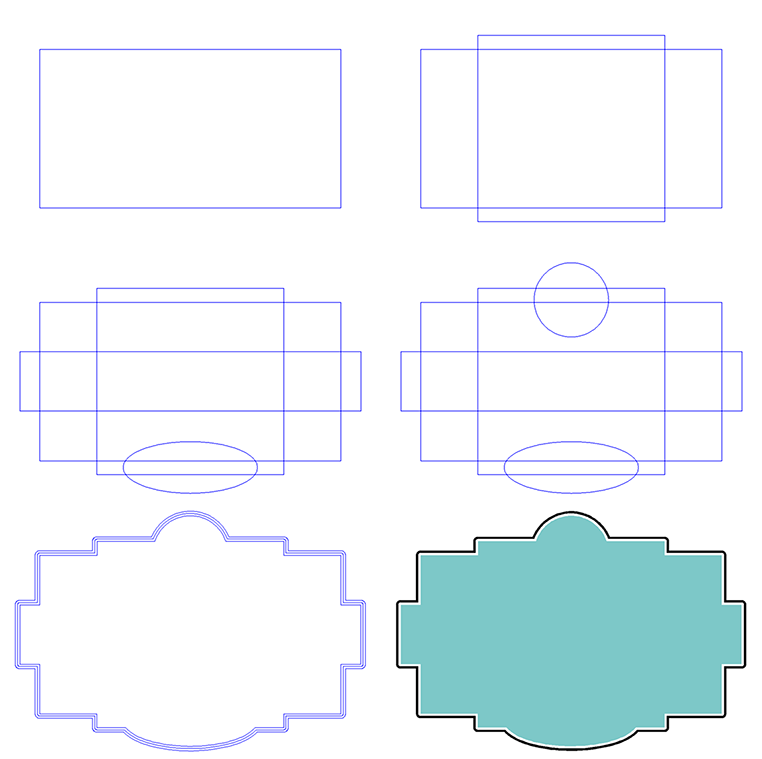
Creating simple shapes is just a click and drag of the mouse away! In one easy step you can draw a square, rectangle, circle or ellipse. All of these are available from one fly-out icon in the toolbar.
We also have the option of drawing a Rounded Rectangle. This feature replicates any changes you make to the radius of one corner to all the corners.
This example draws several shapes, Welds them together, adds an Outline, and adds Colors to create a border.
|
SL |
SS |
SA |
SG |
SP |
NW |
N+ |
NP |
Distribute

Another useful design tool, Distribute is used to equally space objects of a group vertically or horizontally. Not to be confused with the Alignment tools, Distribute simply evenly spaces the objects along an axis.
|
SL |
SS |
SA |
SG |
SP |
NW |
N+ |
NP |
Faster screen refresh
|
SL |
SS |
SA |
SG |
SP |
NW |
N+ |
NP |
Full Color Animated Transformations
|
SL |
SS |
SA |
SG |
SP |
NW |
N+ |
NP |
Grids
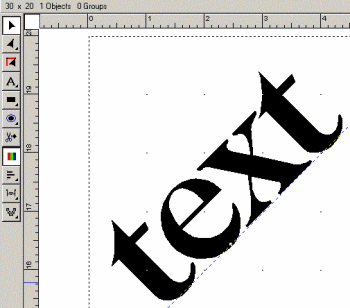
A Grid can be put in the layout area at a user specified interval, such as one inch or one centimeter, which can be used to help layout and positioning. You can specify objects to snap to the grid, similar to how guidelines operate.?
|
SL |
SS |
SA |
SG |
SP |
NW |
N+ |
NP |
High Quality Anti Aliased Drawing Mode
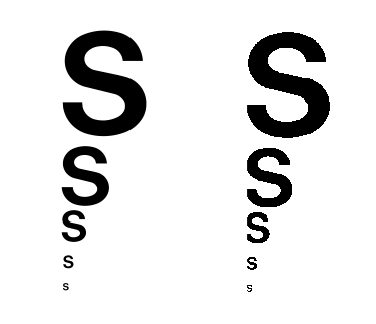
This great new feature gives you vastly improved screen rendering quality, enhancing your design process and effectively increasing your screen resolution by at least 50%, because you don't have to zoom in to details nearly as often.
|
|
|
SA |
SG |
SP |
NW |
N+ |
NP |
History Window
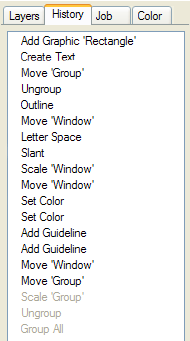
The History Window shows all the actions performed on the layout since it was opened. They are named, so it's easy to Undo back to the exact spot you want to, without performing each undo separately. Using the Redo feature, you can then skip back ahead to the current state. The actions that are grayed out can be re-done.
|
SL |
SS |
SA |
SG |
SP |
NW |
N+ |
NP |
Layers

Layers allow you to better organize the elements of your design. You can drag graphics between layers, and rearrange layers to suit your needs. You can also lock layers from editing, and hide them from the screen and from being printing.
|
|
|
SA |
SG |
SP |
NW |
N+ |
NP |
Measure Tool
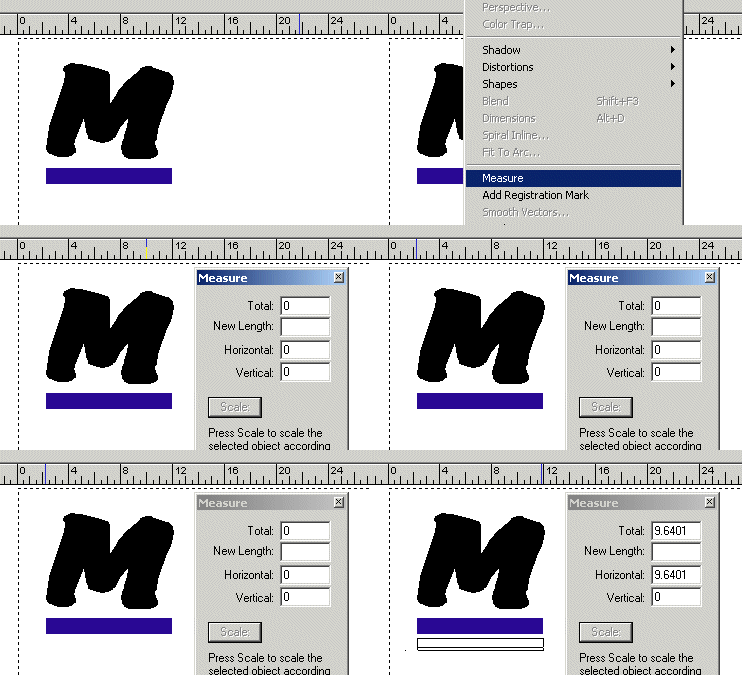
The Measure Tool is used to measure the distance between any two points in the design.
For 6, a property bar is used.
|
|
|
SA |
SG |
SP |
NW |
N+ |
NP |
Mirror
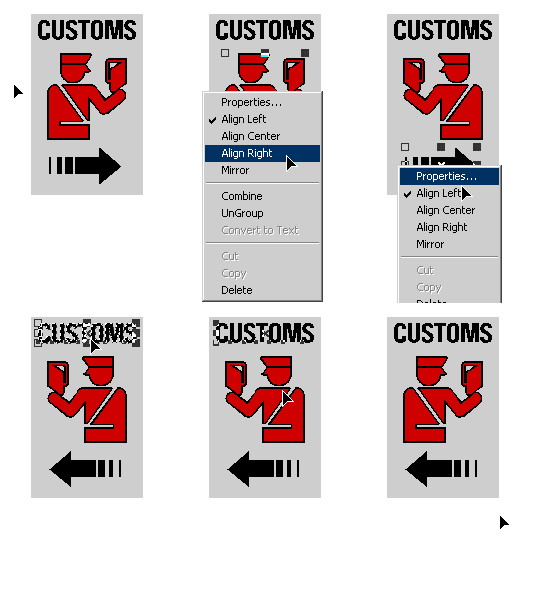
A simple and convenient design tool, Mirror lets you reverse an object or line of text. You may mirror vertically or horizonally, and there is a keyboard shortcut to make it even faster.
|
SL |
SS |
SA |
SG |
SP |
NW |
N+ |
NP |
Move to Layer
|
|
|
SA |
SG |
SP |
NW |
N+ |
NP |
Nested Groups
|
SL |
SS |
SA |
SG |
SP |
NW |
N+ |
NP |
Redo
|
SL |
SS |
SA |
SG |
SP |
NW |
N+ |
NP |
Rounded Rectangle
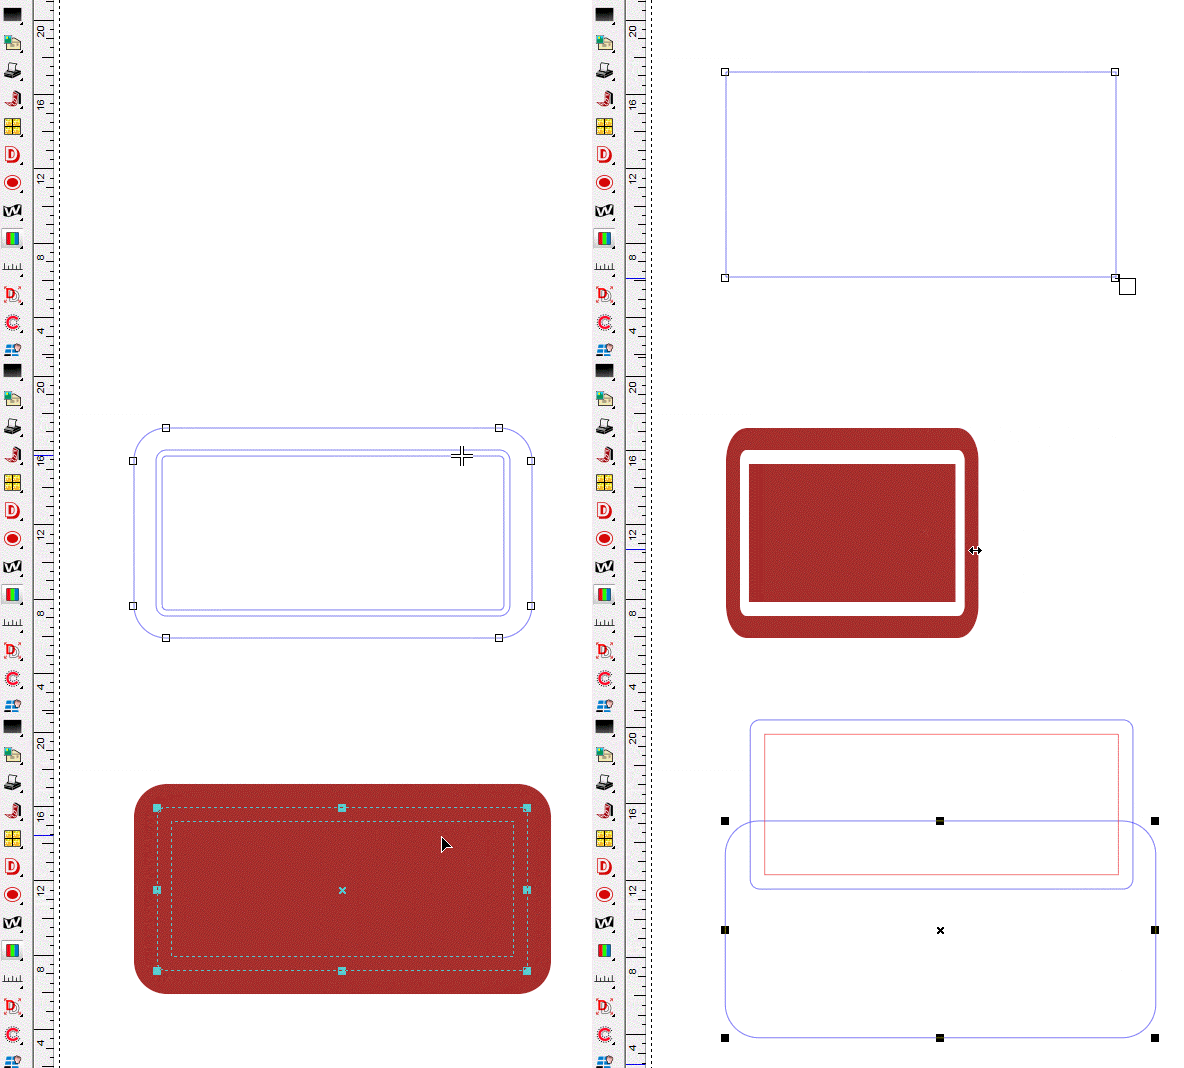
Rounded Rectangle adds a button to extract the two rectangles into two separate graphics.
Also, no matter how you change the aspect ratio, the corners will now be normalized to perfect radii automatically.
|
SL |
SS |
SA |
SG |
SP |
NW |
N+ |
NP |
Rulers
|
SL |
SS |
SA |
SG |
SP |
NW |
N+ |
NP |
Snap a Guideline to an Object with Ctrl Key
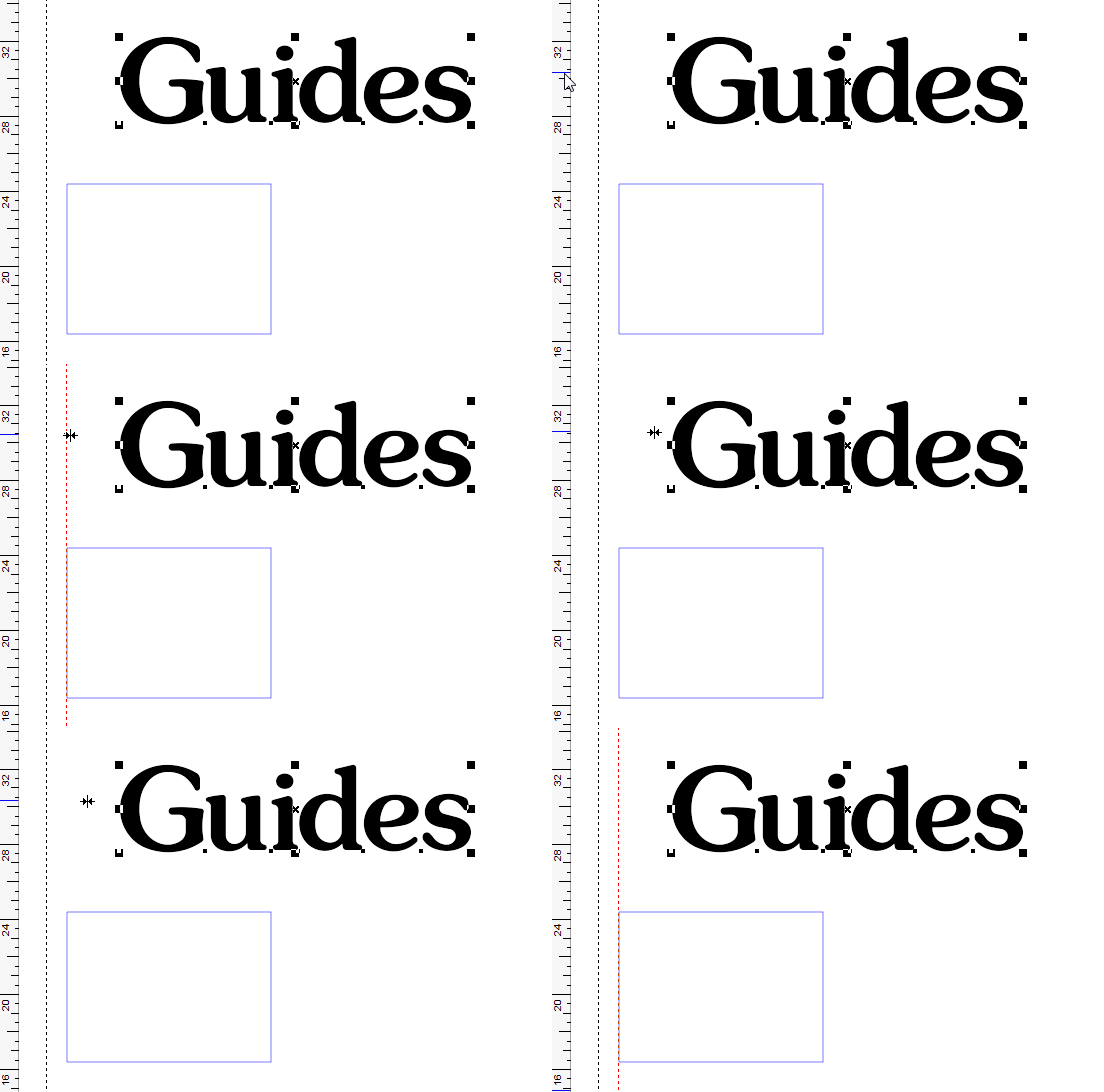
Guidelines are enhanced with the ability to snap a guideline to an object instead of the reverse. The Ctrl key enables this option.
|
SL |
SS |
SA |
SG |
SP |
NW |
N+ |
NP |
Snap to Guidelines
|
SL |
SS |
SA |
SG |
SP |
NW |
N+ |
NP |
Stack
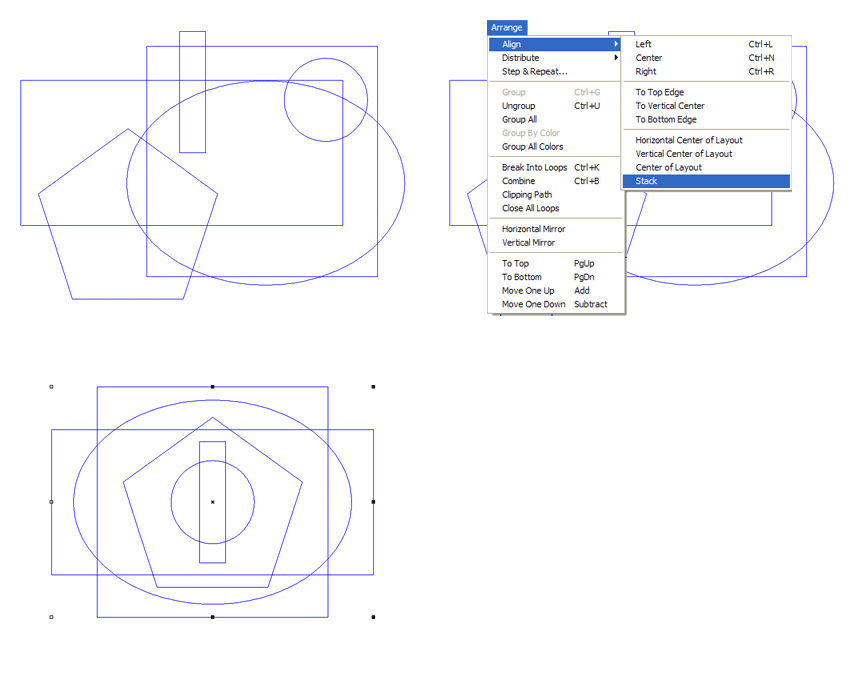
This feature stacks multiple objects on top of each other, aligned at the exact center.
|
|
|
SA |
SG |
SP |
NW |
N+ |
NP |
Step and Repeat
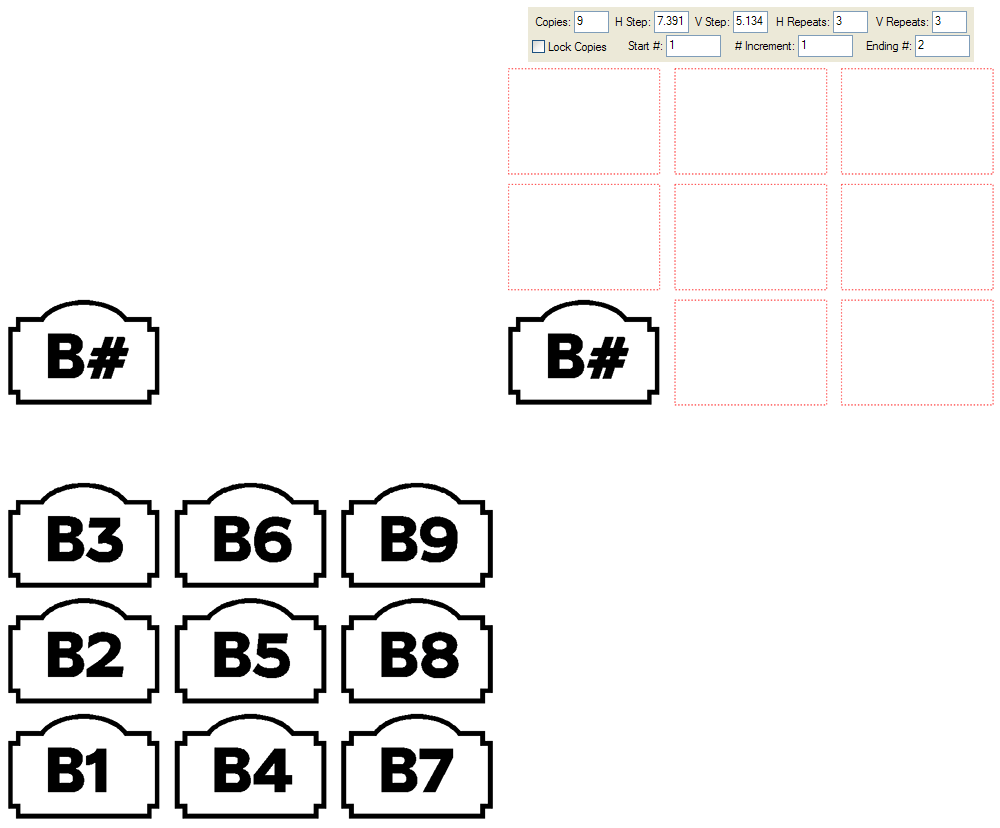
Step and Repeat is used to make multiple copies of an object in the vertical and/or horizontal directions at a specified distance apart. This feature is especially useful in making custom logos, borders, and layouts of the same object for mass production.
Please also see Step and Repeat in the Plot Manager.
Step and Repeat for version 6 now features an intuitive graphic display of the proposed layout, as well as a property bar. You can also create a sequence of numbers, as in this example for motel room numbers.
|
SL |
SS |
SA |
SG |
SP |
NW |
N+ |
NP |
Streamlined User Interface

The user interface for version 6 has been greatly streamlined. Property bars are used extensively to speed the design process and minimize pop dialog boxes that can obstruct the screen.
Property Bars appear at the top of the screen when you are working in a certain mode, such as Vector Editing, or in a certain feature, such as Shadows. The property Bar shown here is for bitmap editing.
|
SL |
SS |
SA |
SG |
SP |
NW |
N+ |
NP |
Text Notes enhanced with Title and Fields
|
|
|
SA |
SG |
SP |
NW |
N+ |
NP |
Automatic Vectorizing
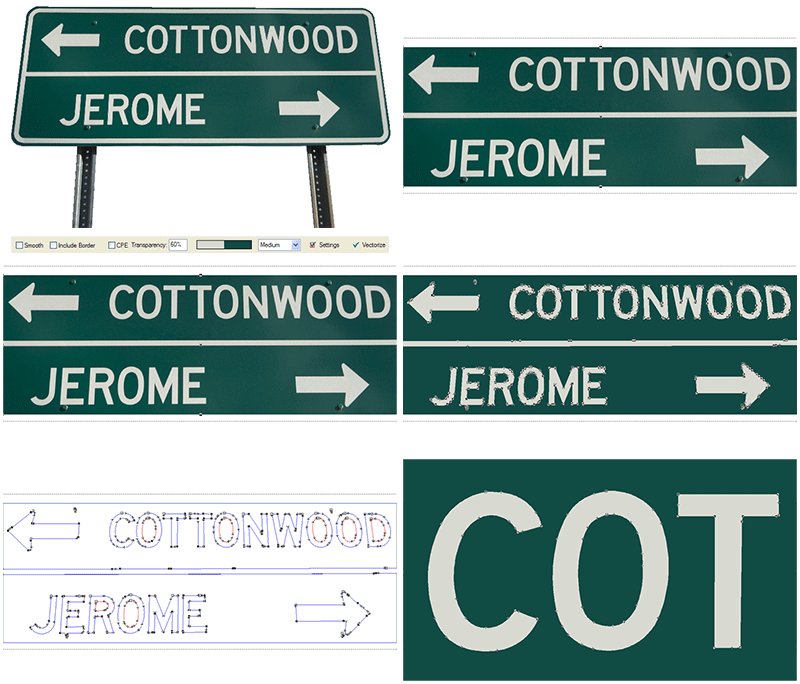
Vectorizing is the process of converting a bitmap image to a vector image so that it can be plotted or cut out of vinyl or other material. We provide a number of features and options to make this process fast and accurate, including different settings to use for different kinds of artwork.
Vectorizing and the associated vector editing tools are important capabilities in our higher end programs that will save you time and money when dealing with custom logos and graphics.
Please also see Color Vectorizing.
In 6, a property bar is used so that no part of your scanned image is obscured.
|
|
|
SA |
SG |
SP |
|
N+ |
NP |
Dimensioning

Dimensioning is fast, easy and precise ? it doesn?t get any easier than this.
Click on the Dimension tool or on Dimensions in the Tools menu. As you move the cursor around the screen, guidelines will appear momentarily as you move past each of the horizontal and vertical lines in the layout. Click when the correct guideline appears, drag the mouse to the second guideline and click again. Then move the mouse where you want the numbers to appear. You can change the size of the numbers and the arrowheads with a single click of the mouse. You can also display the numbers in feet, inches, fractions or decimals.
|
|
|
|
SG |
SP |
|
N+ |
NP |
Hot Keys can be used without Control, Shift or Alt
|
|
|
|
SG |
SP |
|
N+ |
NP |
Polygon/Star Tool
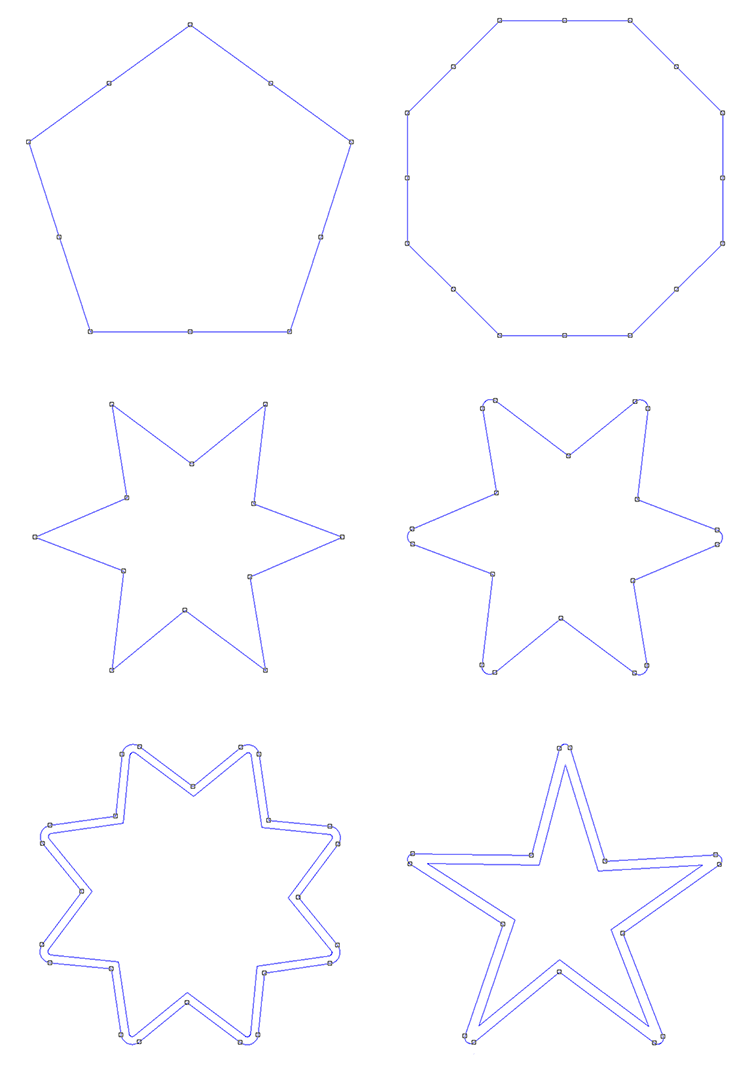
With this tool you can create a polygon or a star with a number of different shapes and styles. There are editable nodes on each side and on each endpoint of the polygon or star that will replicate to all sides. You may also round the endpoints, add any number of sides, even create an inline. This is the ultimate Shapes tool!
|
|
|
|
SG |
SP |
|
N+ |
NP |
Styles
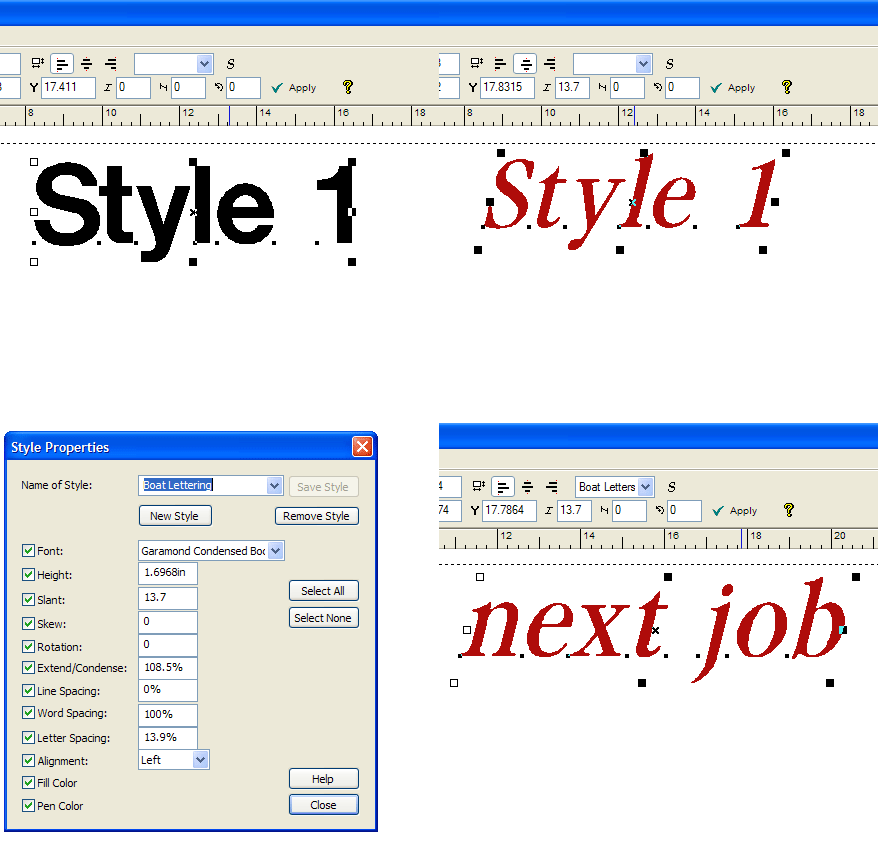
Styles offer a way to save various properties of text or graphics so that you can apply them over and over in the future. If you have a customer who repeatedly orders highly customized lettering, just save the text properties (such as height, color, letter spacing, slant, etc) as a Style. Now you won't have to reinvent the job every time!
In this example, the user creates a Style called Boat Lettering, which contains specific properties of a client's lettering specification. Now he's ready for the next job, when he can simply apply the Style to any text.
|
|
|
|
SG |
SP |
|
N+ |
NP |
TWAIN Support
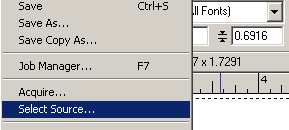
Compatibility with the TWAIN scanning interface means that you can call your scanning software directly from Sign Wizard or Neon Wizard through the Acquire function. After scanning, the image will come straight into the program from your scanning software - you don't have to save and then open any files. This provides a big time saver since you don't have to leave your signmaking program to import custom artwork.
|
|
|
SA |
SG |
SP |
|
N+ |
NP |
Color Vectorizing

Color vectorizing enables you to scan a color image, separate the colors, and convert it into vectors. Unique bitmap processing and vector editing features make Sign Wizard's color vectorizing reliable, fast, and simple.
This feature provides a whole new set of capabilities for your shop. Now you can bring in color graphics and logos without the hassle. The color vectorizing capability builds on our 10+ years of experience with black and white vectorizing.
|
|
|
|
|
SP |
|
|
NP |
Height and Slant Options in Soft Shadow

You can now change the height and slant of soft shadows.
|
|
|
|
|
SP |
|
|
NP |
Effects
|
| |
Common Weld
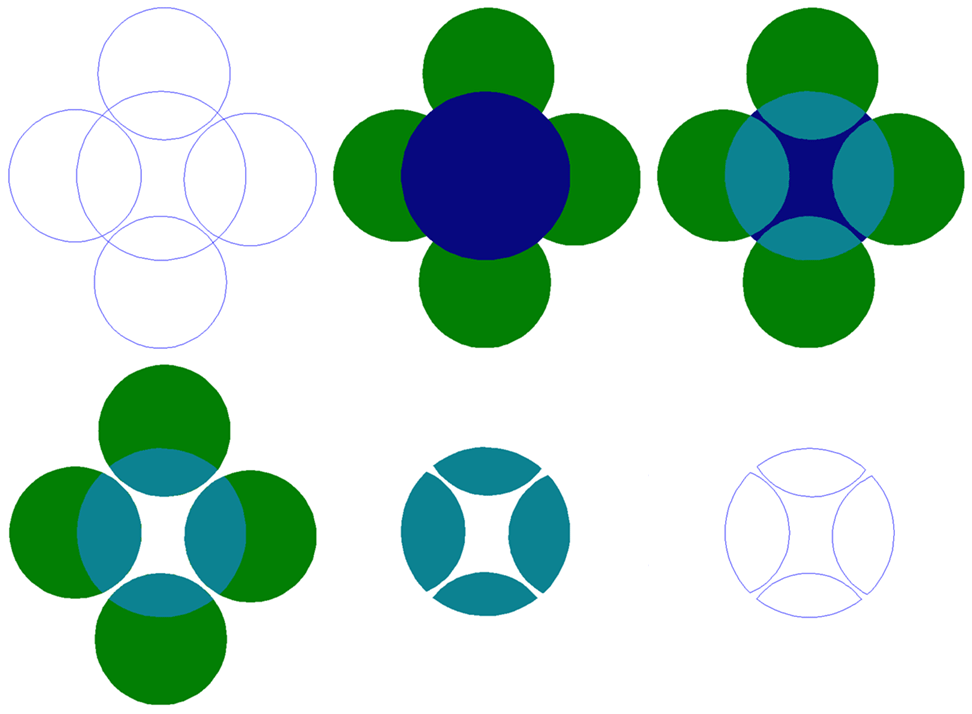
This variation on weld preserves only the shapes that are in common between the various graphics to be welded. It is kind of like the opposite of Weld, where the overlapping areas are retained instead of removed.
The example shows overlapping circles that are colored to help demonstrate the effect. The aqua colored portion is the overlapping portion that is retained in the Common Weld operation.
|
|
SS |
SA |
SG |
SP |
NW |
N+ |
NP |
Contour Outline

This variation on the Outline feature enables you to create one smooth outline around the outside of any design in one simple and fast operation.
This is an interactive effect, meaning that you can see a preview of the countour outline as you create it graphically. You can also enter numeric measurements if you need to be very precise.
Version 6 uses a property bar for streamlined operation.
|
SL |
SS |
SA |
SG |
SP |
NW |
N+ |
NP |
Warp

Warp is a handy way to create a virtually unlimited number of distortions on your text or graphics. It can be automatically reapplied when changing fonts or editing text when used with Paragraph Text.
|
|
|
|
SG |
SP |
NW |
N+ |
NP |
Weld

Welding combines two or more objects or lines of text together where they overlap. This feature has very broad use in creating custom graphics and logos. To use this tool, all you have to do is overlap the text or graphics and click on the Weld tool.
In this example, we have entered a line of text using a serif font, reduced the character spacing, grouped the text together, and then clicked on the Weld tool.
|
|
SS |
SA |
SG |
SP |
NW |
N+ |
NP |
Cast Shadow

Another of the many shadows available, Cast Shadow lets you create striking shadows graphically or numerically. This shadow simulates the sun casting a shadow on the ground behind the lettering or graphic. The original object will cut through sections of the shadow so that there are no overlapping pieces of vinyl. The dialog box allows you to enter the height and angle numerically if the design requires this level of precision.
Version 6 uses a property bar for streamlined operation.
|
|
|
|
SG |
SP |
|
N+ |
NP |
Drop Shadow

Dramatic drop shadows can easily be created graphically or numerically, and you always have an interactive preview to show you exactly what the shadow looks like.
Here you can see that there are options for the position of the shadow, an outline on the text, and the colors.
Version 6 uses a property bar for streamlined operation.
|
|
|
|
SG |
SP |
|
N+ |
NP |
Inline/Outline

Inline/Outline creates an inlined or outlined path from lettering and graphics. This classic Effect has been improved in version 6 with an optional second outline and a property bar to help manage the options. As with other Effects, you can define the Inline or Outline graphically and/or numerically.
|
SL |
SS |
SA |
SG |
SP |
|
N+ |
NP |
Knife
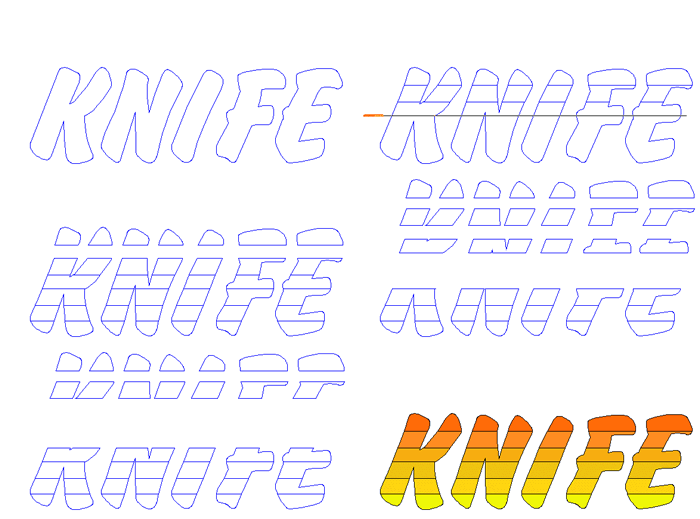
The Knife tool is a great feature that enables you to slice any vector graphic into as many pieces as you want. You can adjust the cut to have zero width, a gap or an overlap of whatever amount you specify. The above example shows a series of horizontal cuts, but you can make the knife cut at any angle. To use this feature, simply select the Knife tool, click where you want the knife to start, and then drag it across the image you are cutting.
Version 6 uses a property bar for streamlined operation.
|
|
SS |
SA |
SG |
SP |
|
N+ |
NP |
Text on a Path

This feature allows you to fit a line of text to a complex path defined by one or more Bezier curves. It is also a Dynamic Effect, meaning that you can edit any of the text properties at any time.
|
|
|
|
SG |
SP |
|
N+ |
NP |
Clipping Paths

Clipping paths are a more generalized and powerful alternative to the Photomask feature. Clipping paths let you create clipping masks with both vector and bitmap graphics, and can be used in conjunction with Contour Cut for print and cut applications. Photomask is still available, and enhanced, but a Photomask is initially created a bit differently now.
This example shows a person being cut from a background using the following tools: On-Screen Digitizing, Clipping Path, and Feather. Then a new background is added behind the original image.
|
|
|
|
|
SP |
|
|
NP |
Extruded Shadow

Create dramatic three dimensional designs.
Select the text or graphic to be shadowed. Click on the Shadow tool in the toolbox or on Shadow in the Tools menu. Select Extruded Shadow in the Shadow dialog box. With the cursor positioned away from the design, click and drag the right mouse button to move the shadow into the desired position and release the left mouse button. Move the cursor close to the top of the design. Click and drag the left mouse button away from the design to set the amount of the outline. Click on Done to complete the Shadow function.
|
|
|
|
|
SP |
|
|
NP |
Perspective Shadow

It's easy to create a perspective shadow - just drag the shadow and then set the distance the shadow should be from the face.
|
|
|
|
|
SP |
|
|
NP |
Soft Shadow
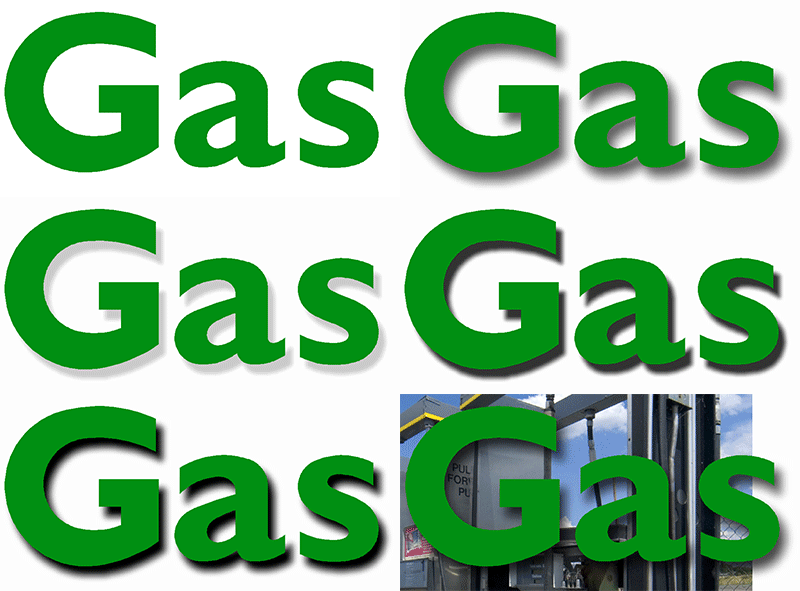
The Soft Shadow has a wide number of uses, and is ideal for designs that will be color printed.
The Soft Shadow feature in version 6 has been totally redesigned. It creates a very realistic shadow effect that's ideal for creating dimensionality for printed signs.
You can see a variety of shadow effects, created by altering the opacity and the softness of the shadow.
The final image shows the shadow on top of a picture to illustrate how the opacity reveals what is underneath.
|
|
|
|
|
SP |
|
|
NP |
Vector Graphics Tools
|
| |
Adjustable tangency indicator
|
SL |
SS |
SA |
SG |
SP |
NW |
N+ |
NP |
Bezier Tool
|
SL |
SS |
SA |
SG |
SP |
NW |
N+ |
NP |
Improved AI/EPS importing
|
SL |
SS |
SA |
SG |
SP |
NW |
N+ |
NP |
Improved AI filter: Versions 1.1, 3 through 6
|
SL |
SS |
SA |
SG |
SP |
NW |
N+ |
NP |
Node Edit: Insert/Delete/Move/Break/Join
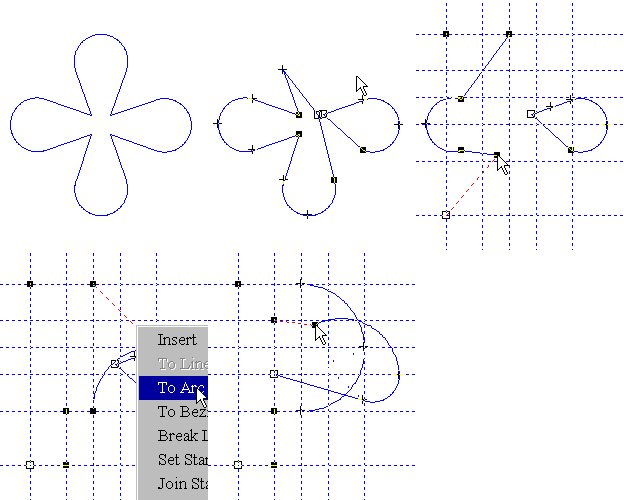
Editing vectors is fast and intuitive without any unnecessary steps.
Changing a flower into a letter is not a typical sign designing task, but it shows how easy and versatile the vector editing tools are. This example is taken from one of the tutorial lessons.
|
SL |
SS |
SA |
SG |
SP |
NW |
N+ |
NP |
On Screen Digitizing

If the quality of a bitmap image is less than ideal, On-Screen Digitizing may be more cost effective than automatic vectorizing for converting bitmap images to vector images because it eliminates vector editing time.
Scan or import a bitmap image. Click on the On-Screen Digitizing tool. Start on any inner loop, preferably a corner, and proceed counterclockwise around the loop selecting lines, arcs and Beziers as needed from the dialog bar to follow the shape of the design. When the inner loops are completed, proceed clockwise around the outer loop(s). Switch to the Vector Edit tool, if needed, to fine tune the vectors so they match the design as closely as possible.
For 6, we've redesigned the bezier tool to work much like the tools in other popular graphics programs, making it much easier for designers familiar with other programs to design graphics in our software.
|
|
SS |
SA |
SG |
SP |
NW |
N+ |
NP |
Optimize Vectors
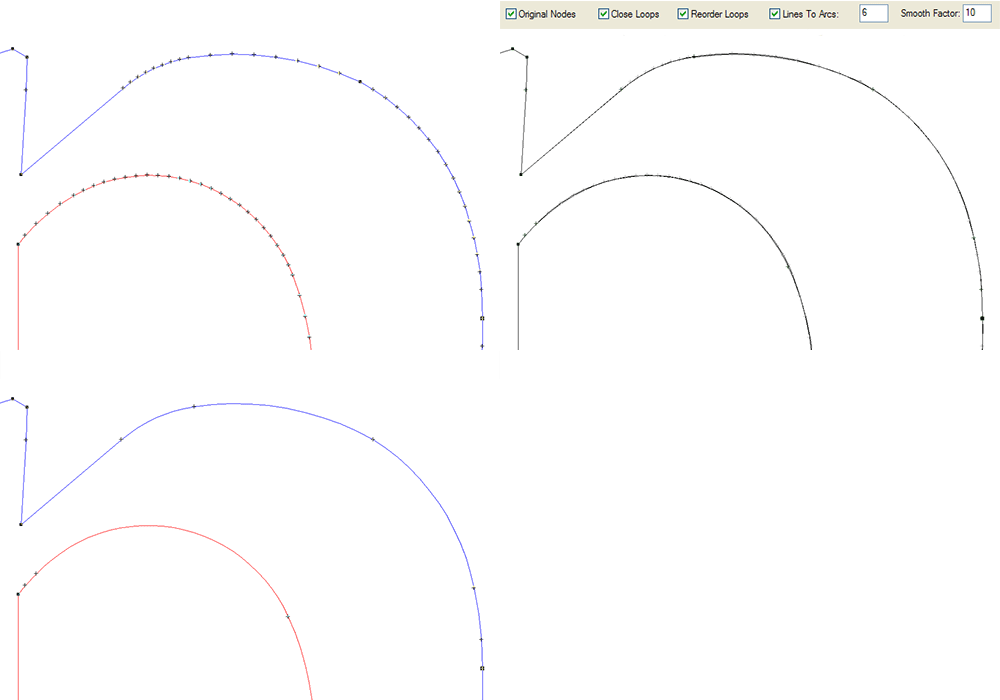
Optimize Vectors is a must-use feature for imported files and vectorized files to ensure good, clean data. Optimize Vectors has replaced and improved upon the Smooth Vectors command.
This one feature enables you to reduce the number of vectors, close loops, and reorder loops. It will also convert chords into arcs and lines for better and faster operation in the program.
A property bar is used, and you can now see the OLD path superimposed with the new smoother path to ensure that there is not too much deviation with the settings you've used.
|
SL |
SS |
SA |
SG |
SP |
NW |
N+ |
NP |
PDF Import and Export
|
SL |
SS |
SA |
SG |
SP |
NW |
N+ |
NP |
Sharp Corner Tool
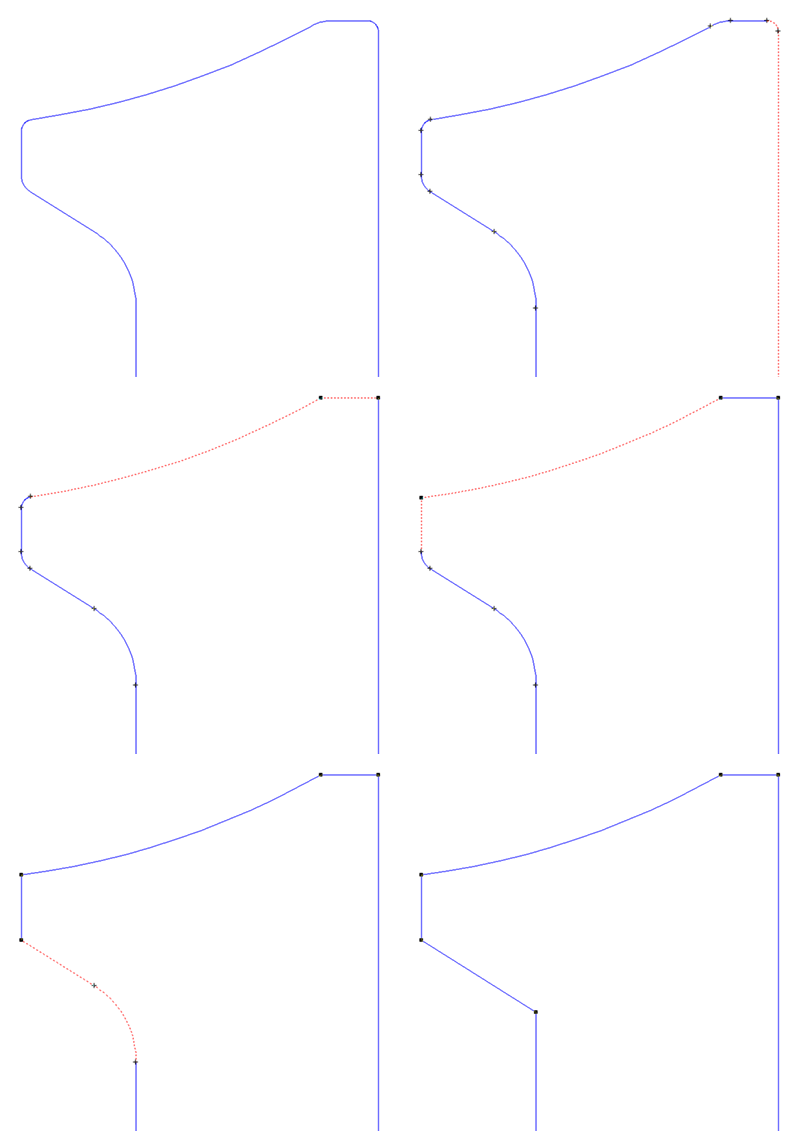
This handy tool will turn a radiused corner into a sharp corner, by deleting the arc and extending the two adjacent vectors so they meet, or joining with the straight lines if the projections won't intersect.
|
SL |
SS |
SA |
SG |
SP |
NW |
N+ |
NP |
Vector Filters: DXF,EPS,AI,EMF,more
|
SL |
SS |
SA |
SG |
SP |
NW |
N+ |
NP |
Image Manipulation Tools
|
| |
Bitmap Filters: BMP, JPEG, TIFF, more
|
SL |
SS |
SA |
SG |
SP |
NW |
N+ |
NP |
Export Original Bitmap
|
SL |
SS |
SA |
SG |
SP |
NW |
N+ |
NP |
Interactive Bitmap Rotate Tool
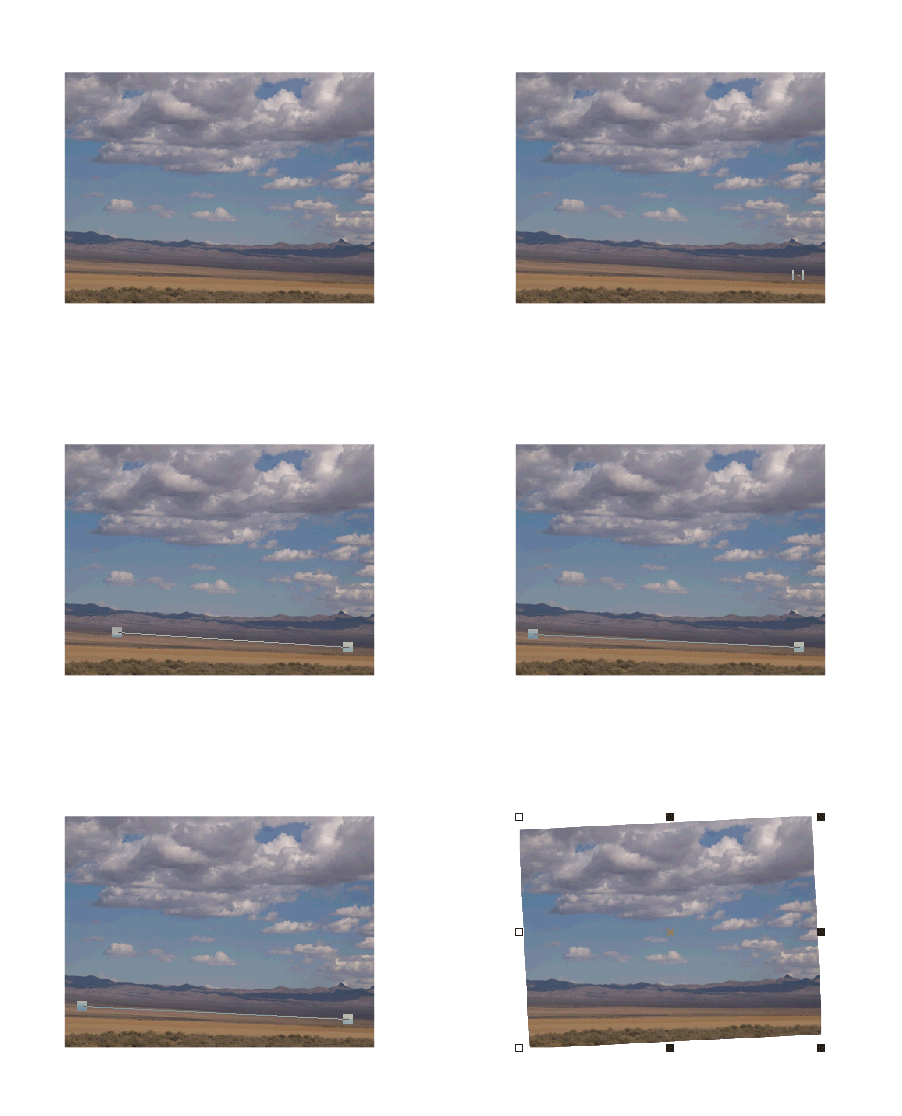
This tool is very handy for rotating an image that is slightly skewed. You simply drag a line along the horizon to define the angle to rotate.
|
|
|
SA |
SG |
SP |
NW |
N+ |
NP |
Adjust Bitmap Brightness
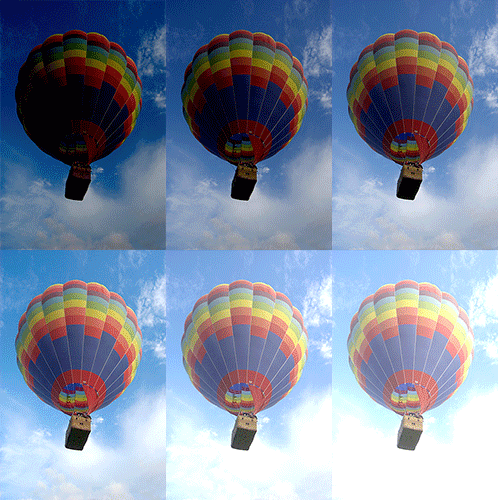
The image brightness can be edited in the Image Property Bar. A negative number makes the image appear darker and a positive value makes the image appear brighter.
|
|
|
SA |
SG |
SP |
|
N+ |
NP |
Adjust Bitmap Contrast
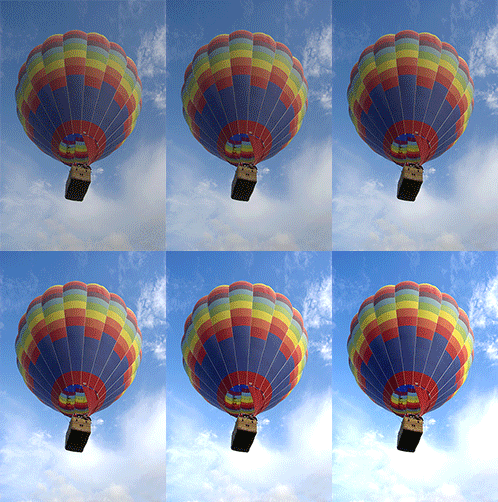
The contrast of an image can be adjusted right in the Image Property Bar. Lowering the contrast makes the image have more mid-tones, while increasing contrast makes the image have more extreme light and dark tones.
|
|
|
SA |
SG |
SP |
|
N+ |
NP |
Adjust Bitmap Saturation
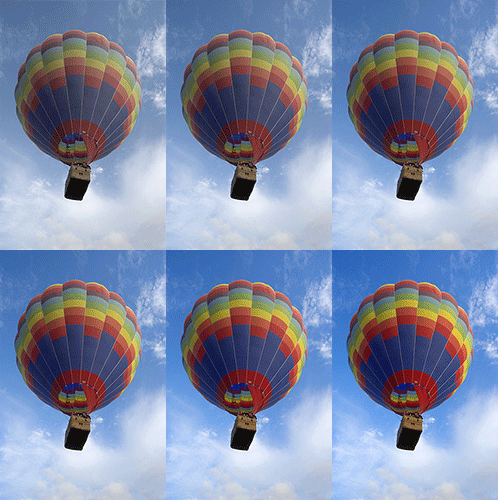
The image saturation can be edited in the Image Property Bar. A negative number makes the image appear less saturated and a positive value makes the image appear more saturated.
|
|
|
SA |
SG |
SP |
|
N+ |
NP |
Crop Bitmap
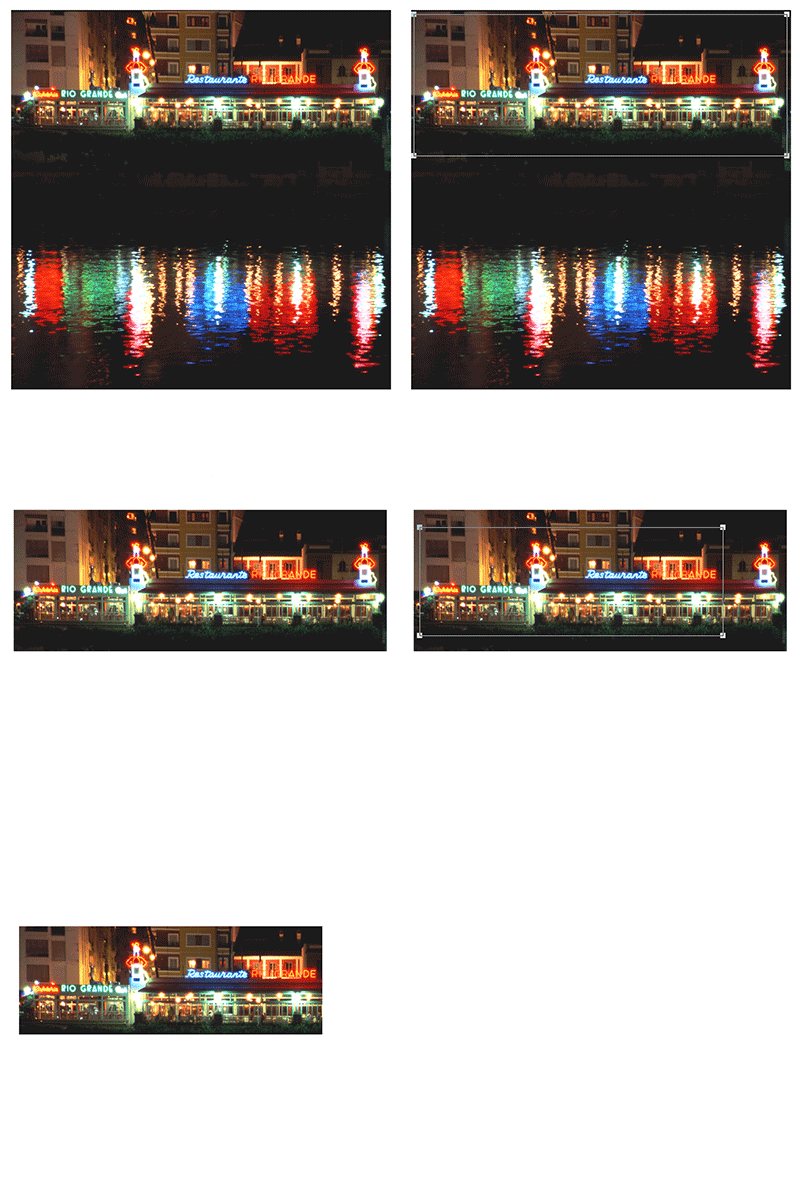
This handy tool lets you crop a bitmap into a smaller image. When you select the tool from the Image Property Bar, it will appear on the screen as a rectangle with four editable corners. Simply edit the shape and then double click the mouse to crop out the unwanted areas.
|
|
|
|
SG |
SP |
|
N+ |
NP |
Cutting/Plotting and Printing
|
| |
All popular plotters/cutters supported
|
SL |
SS |
SA |
SG |
SP |
NW |
N+ |
NP |
All Windows printers supported
|
SL |
SS |
SA |
SG |
SP |
NW |
N+ |
NP |
Horizontal and Vertical Paneling

When a design is larger than the vertical media size, or longer than supported by the plotter, then it will be paneled into sections for output. Vertical paneling is very common, and occurs when the design is taller than the usable height of the material. Horizontal paneling occurs when the plotter has a Page Size limit, and the design is wider than this limit. For some large jobs, the design will be paneled in both directions, resulting in four or more distinct panels that need to be aligned and reassembled for installation. Paneling is automatic in the Plot Manager, depending on the settings in the Setup dialog box and the overall size of the design.
This image shows a job paneled in both directions, as indicated by the vertical and horizontal lines in the design. You may also set the size of overlap (if any) between the panels. The exact location of the panel lines can be adjusted, as long as the new position is within the maximum limit. In this example, the horizontal panel line was moved to the left between the "e" and "l" so as not to cut a letter into two pieces.
|
SL |
SS |
SA |
SG |
SP |
NW |
N+ |
NP |
Mirror, Scale, Rotate (Plot Manager)
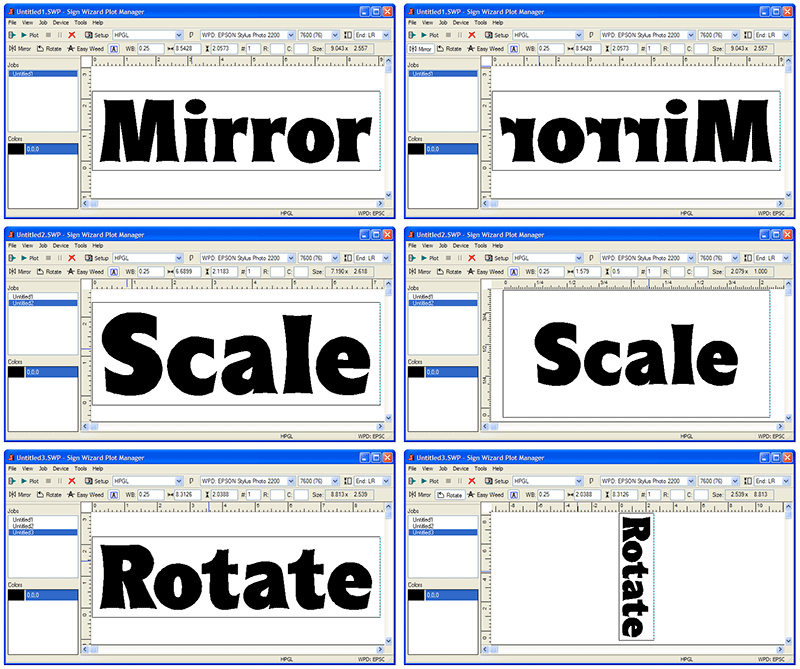
When you bring a design into the Plot Manager, there are several adjustments that you can make before plotting or cutting, including Mirror, Scale, and Rotate. These features are also available in the Layout Window, but here in the Plot Manager they are used for production instead of design purposes. In version 6, convenient icons have been added for Mirror and Rotate.
|
SL |
SS |
SA |
SG |
SP |
NW |
N+ |
NP |
Network Plotting
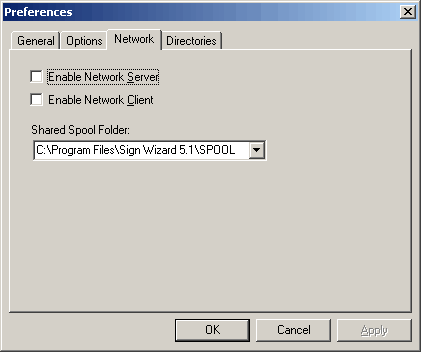
This productivity feature enables you to plot or cut to any machine that is on the network, not just a machine that is attached to the current design computer. You no longer need to design and plot on the same machine with this capability. For a shop with several design stations and/or multiple plotters/cutters, this feature will add significantly to your productivity.
|
SL |
SS |
SA |
SG |
SP |
NW |
N+ |
NP |
Plot to File
|
SL |
SS |
SA |
SG |
SP |
NW |
N+ |
NP |
Print Preview
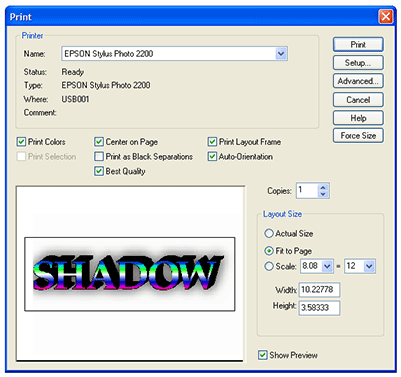
The Print Preview feature lets you see your design before you print, so that you can verify the size and the relative position of the design on the media.
In 6, the Print dialog box has been enlarged.
|
SL |
SS |
SA |
SG |
SP |
NW |
N+ |
NP |
Quick Plot
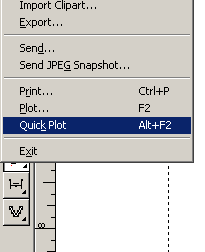
This feature is a handy time saver that enables you to plot directly from the Layout Window to the default plotter, without opening the Plot Manager. You may Quick Plot just a selected object, or the entire layout (assuming it is one color). You must make sure that the Plot Manager is properly configured for your plotter and that your plotter is online before using this feature.
|
|
|
SA |
SG |
SP |
NW |
N+ |
NP |
Step and Repeat (Plot Manager)
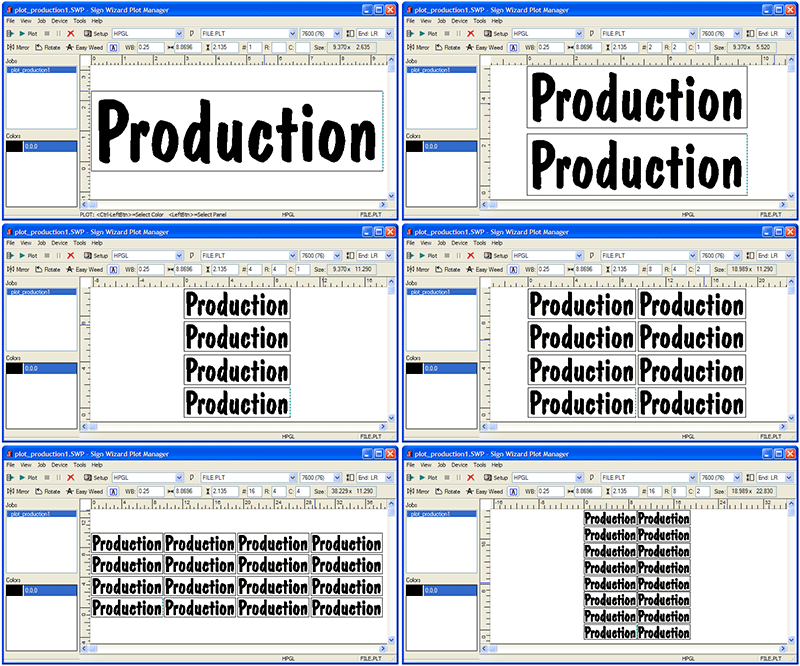
In the Plot Manager, the production module of the software, you may lay out multiple copies of your design using the Step and Repeat function. This is particularly useful if you need to organize the copies on the material in a certain way, because you can specify the X and Y copies of the design. Otherwise, simply enter the number of copies you want, and they will be organized to maximize the use of available material.
In 6, you can now manually specify the the rows and columns of your repeating design, which means the material height is no longer a concern.
|
SL |
SS |
SA |
SG |
SP |
NW |
N+ |
NP |
Streamlined Plot Manager
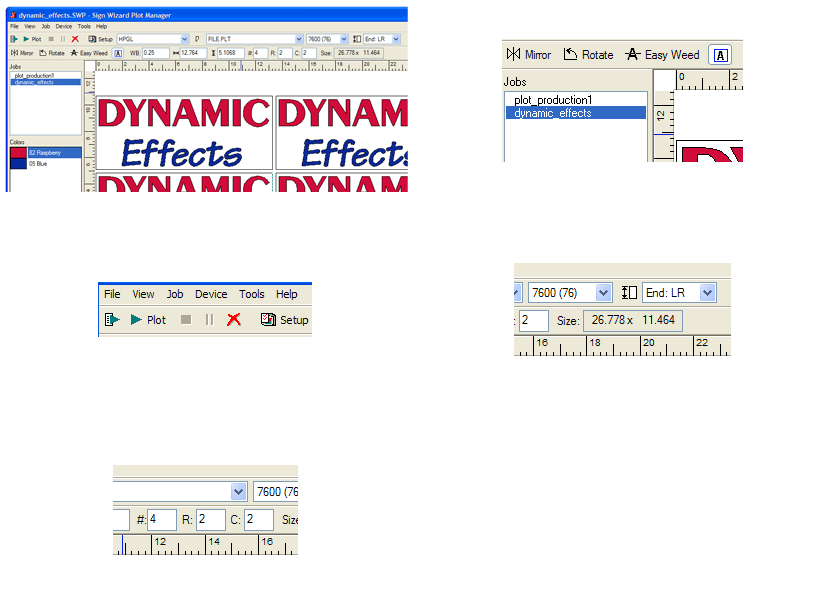
The Plot Manager has been streamlined with a new property bar and menus. These screen shots show various functions of the Plot Manager window, starting with an overall view and proceding to show the new icons for Mirror, Rotate, and Easy Weed, then the Plot, Delete, and Setup buttons, then the new way to set the plot end position, and finally the input fields for Step and Repeat.
|
SL |
SS |
SA |
SG |
SP |
NW |
N+ |
NP |
USB Cutter Support for Summagraphics and Graphtec
|
SL |
SS |
SA |
SG |
SP |
NW |
N+ |
NP |
Vertical Weed Lines in Plot Manager
|
|
|
SA |
SG |
SP |
NW |
N+ |
NP |
Weed Border
|
SL |
SS |
SA |
SG |
SP |
NW |
N+ |
NP |
Weed Line Eraser
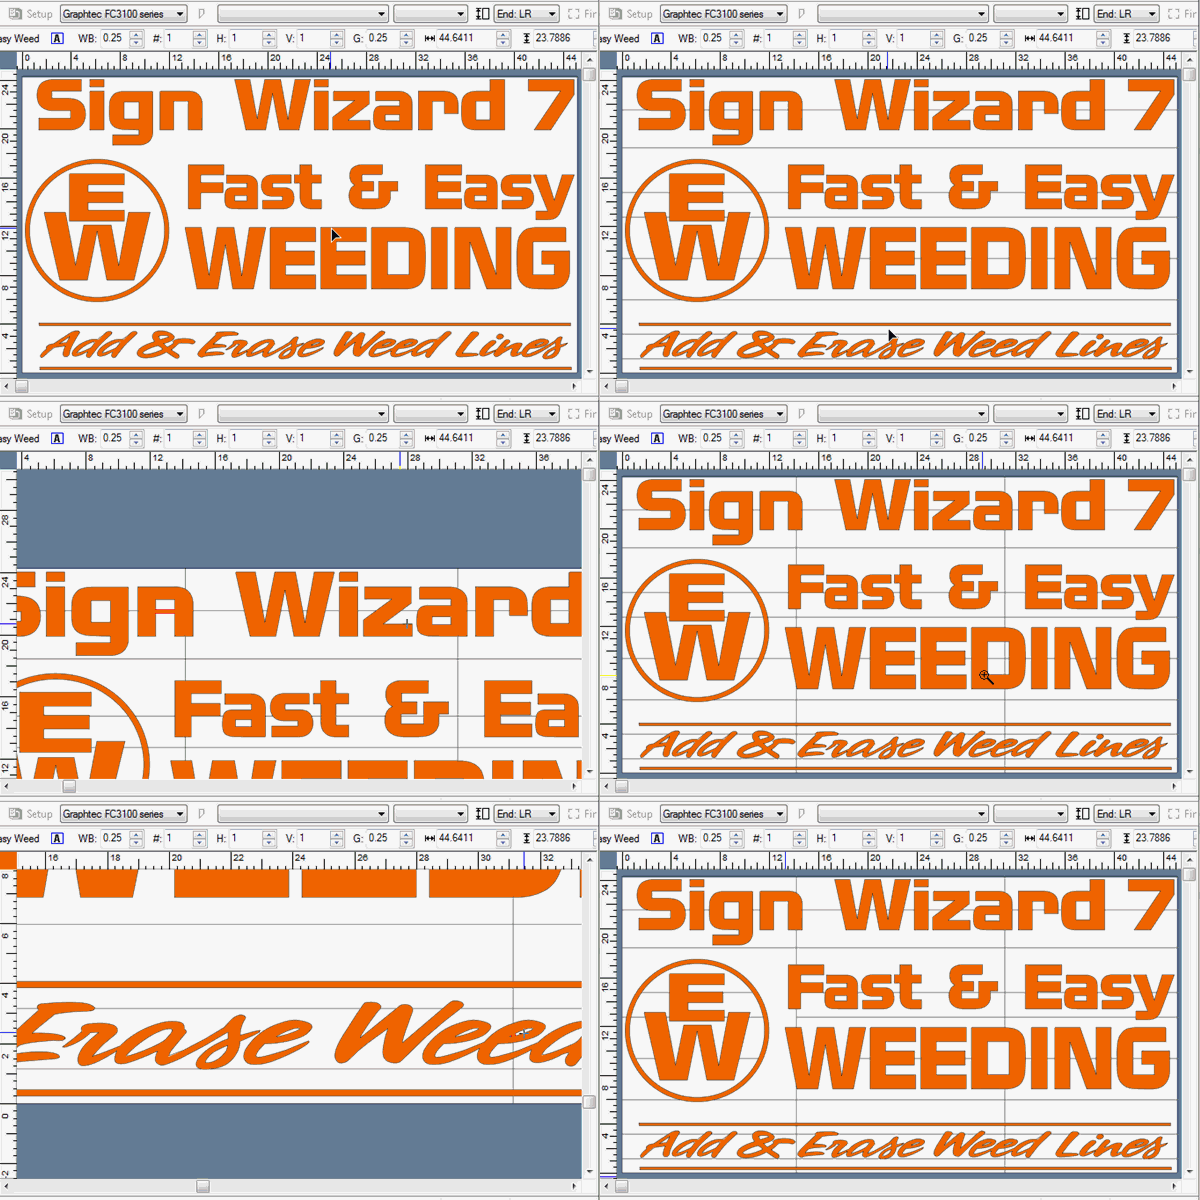
The new Weed Line Eraser tool makes it simple to optimize your weed lines to the specific design, speeding your production and reducing potential problems in weeding.
|
SL |
SS |
SA |
SG |
SP |
NW |
N+ |
NP |
Windows Printer Driver
|
SL |
SS |
SA |
SG |
SP |
NW |
N+ |
NP |
Channel Letter Return Patterns
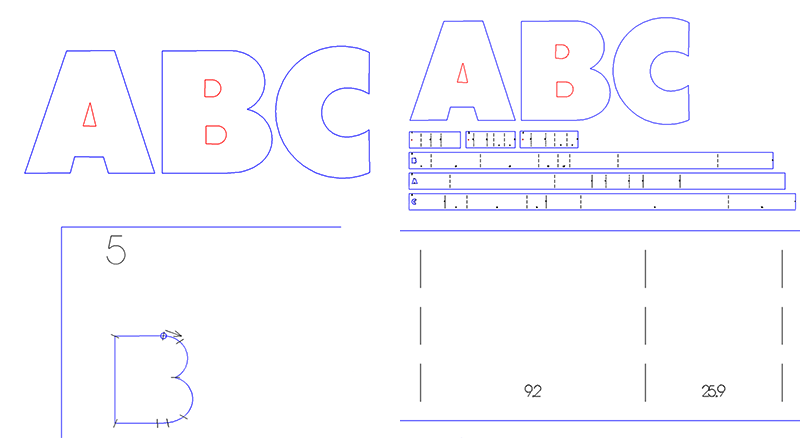
Previously only available as a separate module, this feature automates the tedious process of hand measuring your channel letters for notching and bending the return. It creates a paper pattern with all the appropriate measurements for notches and bends that you simply attach to your return. Why do this by hand when the process can be automated? If you are making channel letters, you can't afford to miss this time saving capability.
This graphic shows a pattern created from the letters "ABC." Each individual loop has an indentifying number and pattern that is nested for plotting. Each pattern contains solid or dotted lines indicating where to notch and bend the return.
This feature is available for $300 in the Advantage Level.
|
|
|
SA |
SG |
SP |
|
N+ |
NP |
Pen Fill
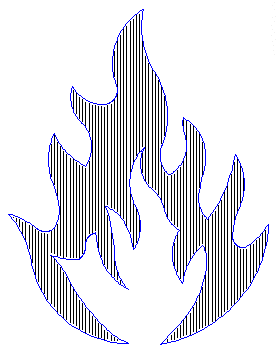
This feature is used with a plotter to fill in areas of a design with a thick pen for a less expensive output option. If a sign is very temporary, or otherwise does not merit using vinyl, this Pen Fill feature makes it easy to create professional paper signs. This example shows an image of a flame that has been filled in. You set the width of the pen and the percentage of the overlap to get the desired effect.
|
SL |
SS |
SA |
SG |
SP |
|
N+ |
NP |
Routing/Engraving Support
|
|
|
|
|
SP |
|
|
NP |
Productivity Tools
|
| |
Auto Save

Auto Save has been improved in 7.0 and in the recent updates to 6.5. The system now is able to the save the segments of the layout that are changing and nothing else, resulting in no delays on large files. This feature means that if the computer loses power or Windows crashes, your work is safe and sound.
|
SL |
SS |
SA |
SG |
SP |
NW |
N+ |
NP |
Customizable Toolbar and Icons
|
SL |
SS |
SA |
SG |
SP |
NW |
N+ |
NP |
Email Layout
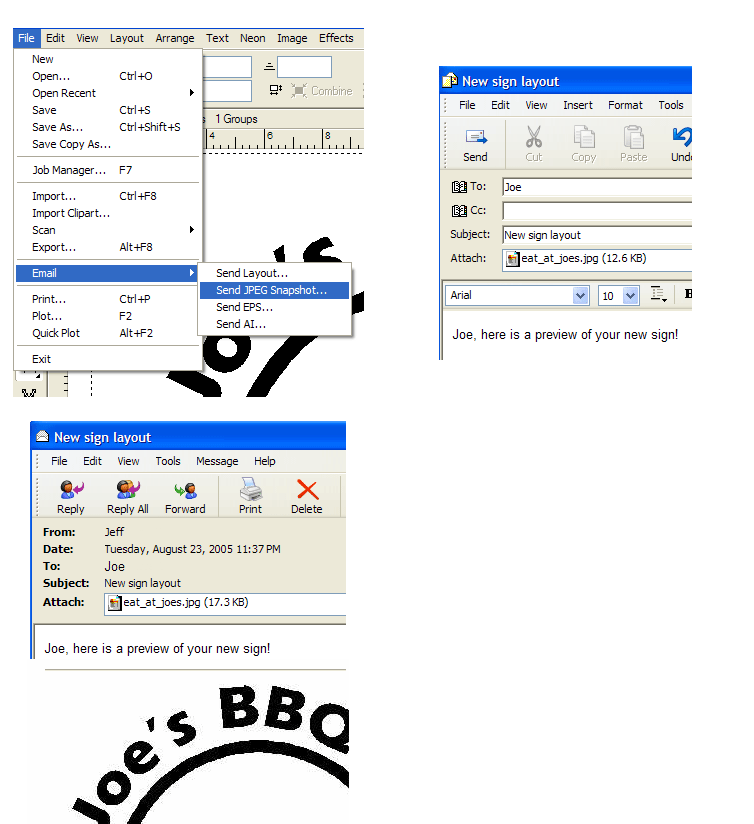
Email a layout, JPG, AI, or EPS file directly to your customer or co-worker from within the program.
|
SL |
SS |
SA |
SG |
SP |
NW |
N+ |
NP |
Job Manager
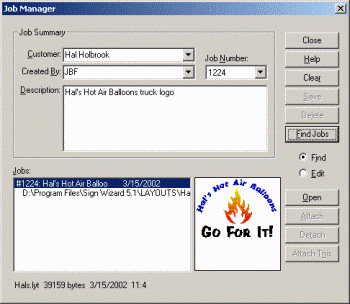
The Job Manager provides everything you need to keep track of your jobs! Never again will you look through files with unintelligible names, with no idea about the job or customer. The Job Manager lets you enter the customer, the designer, a job number, and a description, as well as pertinent information about the file such as when it was created, where it is stored, and its size. You may also attach multiple files to a single job and get a preview of the job when you select it. Finally, you can search on a customer, designer, or job number to find what you're looking for.
This feature helps you stay organized and will save lots of time when you need to find an old job. The Job Manager is especially useful in a larger shop with multiple designers and lots of customers.
|
|
SS |
SA |
SG |
SP |
NW |
N+ |
NP |
Online Help
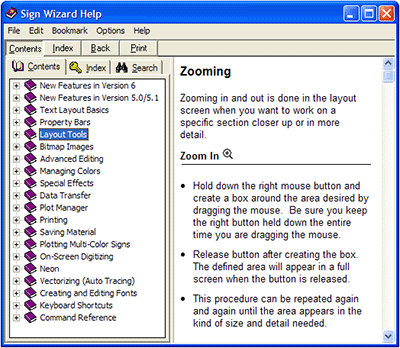
The Sign Wizard Online Help is a valuable resource for learning and operating the software. This help is available at all times by pressing the F1 key or clicking on Help in any dialog box or function. This example below shows some of the description for Zooming in and out.
Similar step-by-step instructions and detailed examples are included for all Sign Wizard features and capabilities.
|
SL |
SS |
SA |
SG |
SP |
NW |
N+ |
NP |
Spell Checker

The spell check feature helps you make sure you don't make a costly mistake before production begins...such as misspelling "poinsettia" for a plaque to be prominantly posted at a poinsettia ranch. You can also add words to the dictionary for next time.
|
|
|
SA |
SG |
SP |
NW |
N+ |
NP |
Tool Tips
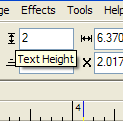
Tool tips are convenient little pop-ups that give you the name of the icon or text box when you move the mouse over it. This is surprisingly useful in operating the program, especially before you know all of the commands. Some of the Tool Tips give you the acceptable range of values for an input field.
|
SL |
SS |
SA |
SG |
SP |
NW |
N+ |
NP |
Unlimited Undo
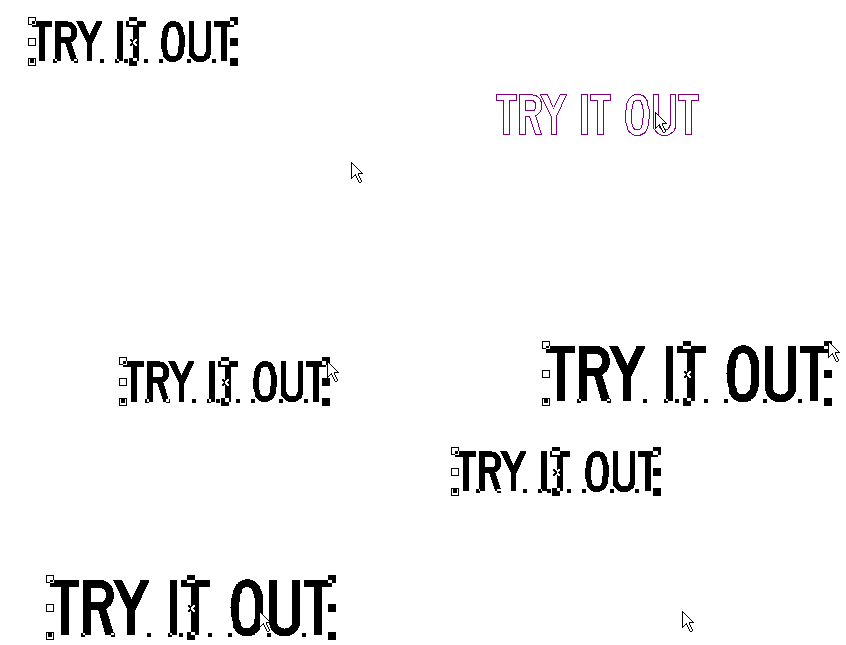
The ability to Undo multiple operations provides increased flexibility in the design process, since you know that you can go back and try something again. This feature enables you to Undo operations all the way back until the last time you saved your design. Simply hit the Backspace key to Undo as many times as you wish in order to experiment with different design ideas.
For 6, Redo has been added, and the Undo mechanism internally redesigned for better reliability.
|
SL |
SS |
SA |
SG |
SP |
NW |
N+ |
NP |
Zooming
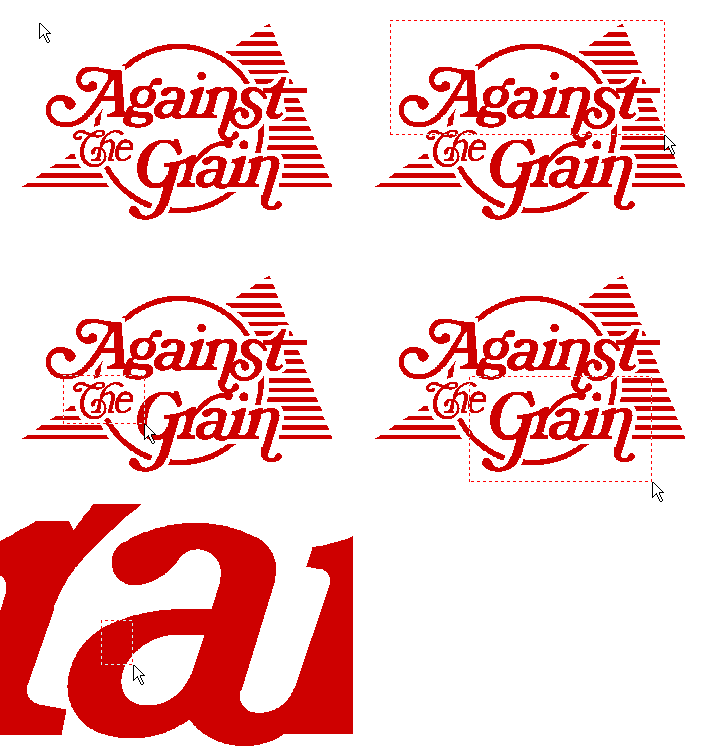
Sometimes it is the little things that make the difference in design productivity. Zooming is a feature that you will use constantly, which is why we made it as easy as possible. Simply draw a box with the right mouse button around what you want to see. There is no tool to select, or special mode to enter. What could be faster or easier?
|
SL |
SS |
SA |
SG |
SP |
NW |
N+ |
NP |
Programmable Hot Keys
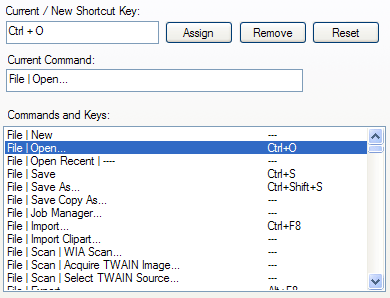
This feature lets you assign your own keys to menu commands, greatly speeding up tasks you perform frequently.
|
|
|
|
SG |
SP |
|
N+ |
NP |
Neon Design Tools
|
| |
Add Blackouts
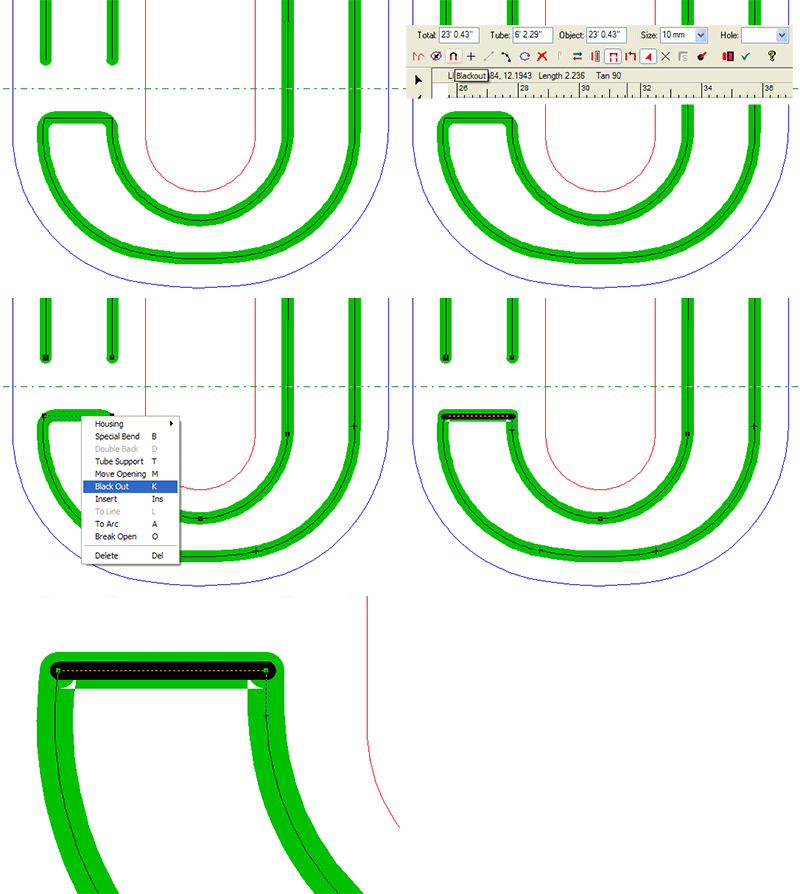
When editing a neon tube, it is easy to add a blacked out section. Simply click on the tube, then click on the Blackout icon or select Blackout from the pop-up menu (both options are shown in the graphic). The tube will now be shown with an inline to indicate that it is blacked out.
The Add Blackout feature is another of the easy neon editing tools designed to put the finishing touches on your pattern.
|
|
|
|
|
|
NW |
N+ |
NP |
Add Common Housings
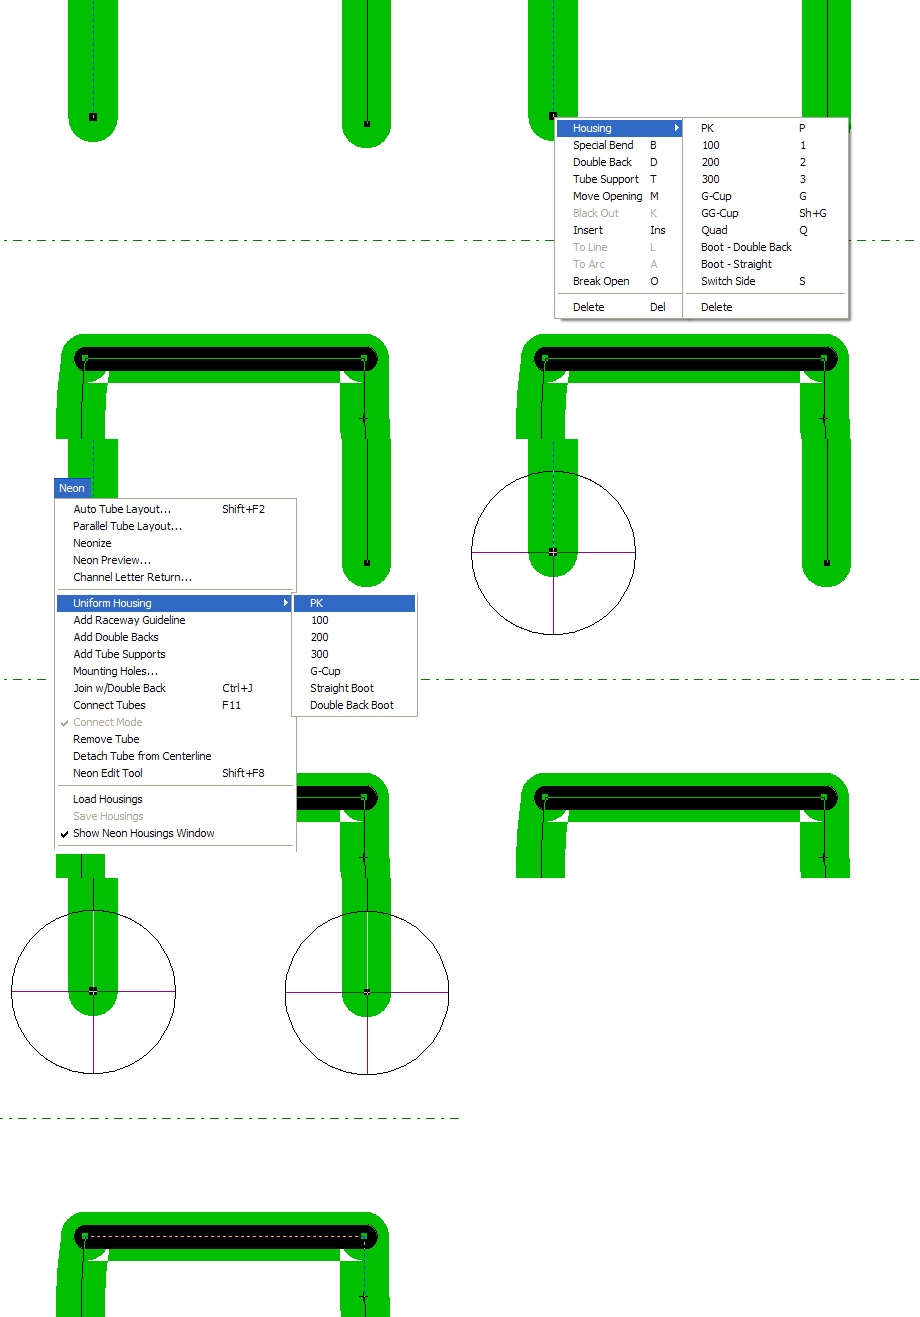
Adding housings to each tube termination is done by just clicking on the termination, then clicking on the appropriate housing icon from the Neon Editing pop_up menu. You can also add the same housing to all terminations in your pattern in one easy step, as shown in the graphic.
The standard housings are PK, 100, 200, 300, G cup, GG cup, Quad, straight boot, and double back boot. You may also add your own custom housings - see Create Custom Housings.
|
|
|
|
|
|
NW |
N+ |
NP |
Add Mounting Holes
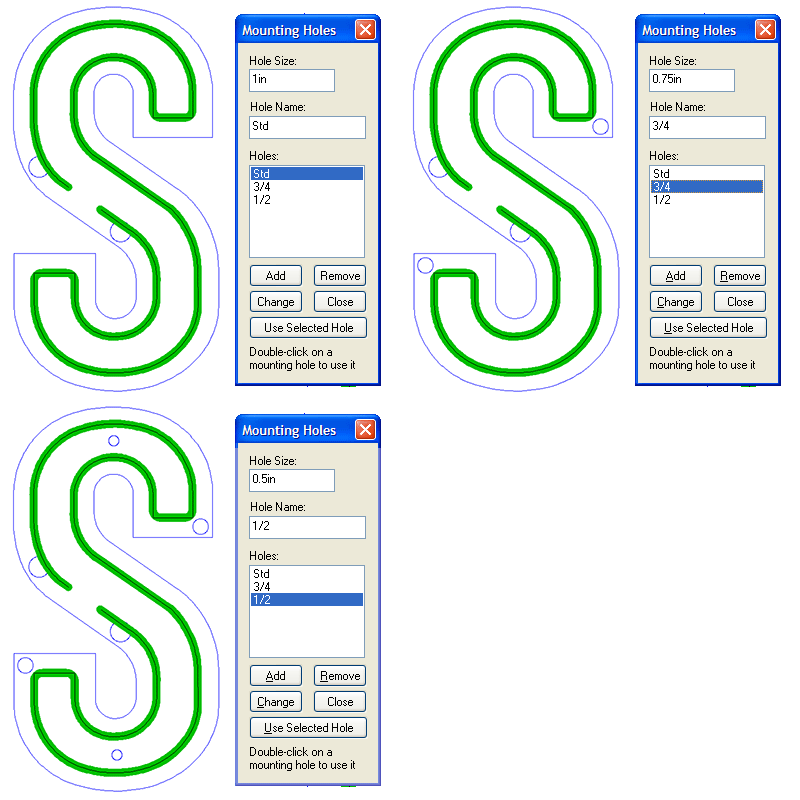
The ability to add mounting holes to your neon design is a very important feature for channel letters and similar applications. You may create custom sized mounting holes, and then place them anywhere on your layout. If you scale the design up or down, the mounting holes will maintain their original size.
Mounting holes can be exported or routed along with some or all of the components of the complete design. See Layers for more information.
|
|
|
|
|
|
NW |
N+ |
NP |
Add Tube Supports
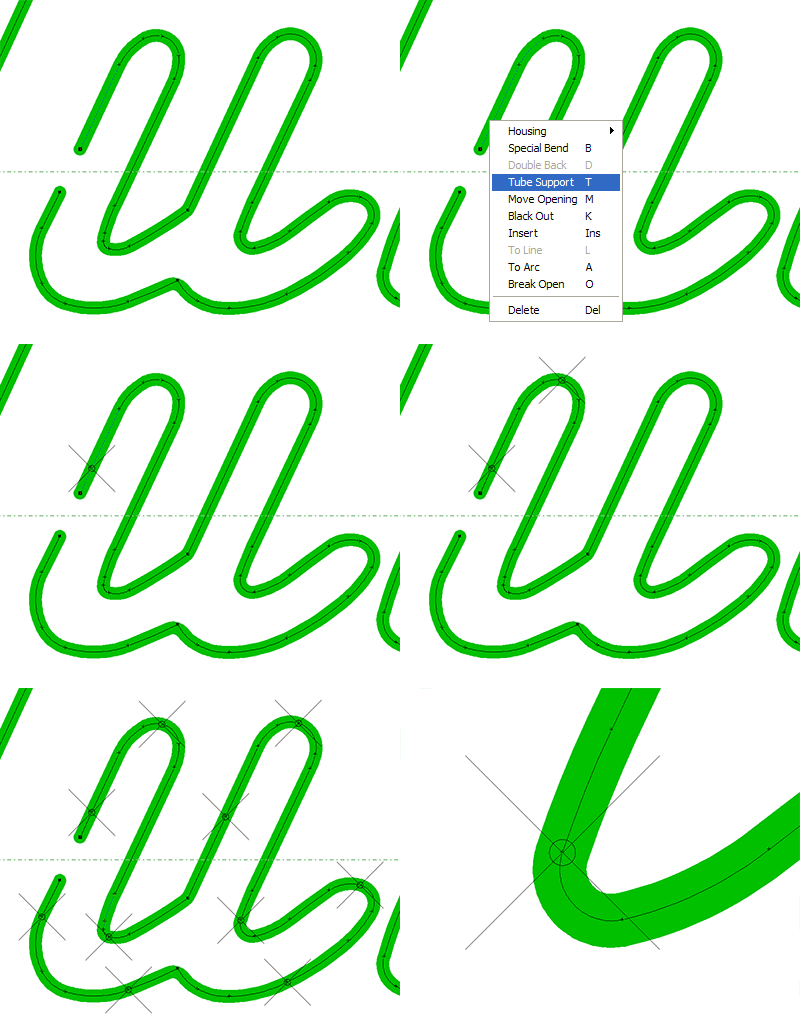
Another of the time saving neon editing features is adding tube supports to your pattern. All you have to do is click on the tube where you want the support, then click on the Tube Support icon from the Neon Editing toolbar or select it from the opo-up menu. The support will be shown on your pattern as a small "X" across the tube. You'll also notice from the graphic that the tube support holes are automatically drawn. These are put on a separate layer that can then be exported to your router.
|
|
|
|
|
|
NW |
N+ |
NP |
Auto Tube Layout
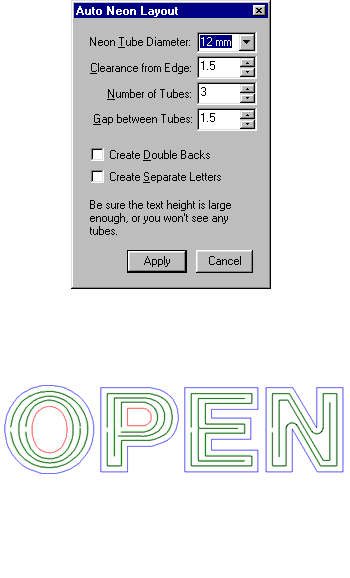
Neon Wizard can easily create channel letter layouts with any number of tubes, including single tube, using the Auto Tube Layout feature. You specify the tube diameter, the number of tubes, the clearance from the edge of the channel letter, and the gap between tubes (if two or more tubes).
In version 6, this tool has been improved with new capabilities (see Neon Auto Spacing and Neon Auto Tube Count) and made much easier to use by utilizing a property bar.
|
|
|
|
|
|
NW |
N+ |
NP |
Change Neon Tube Diameter Only
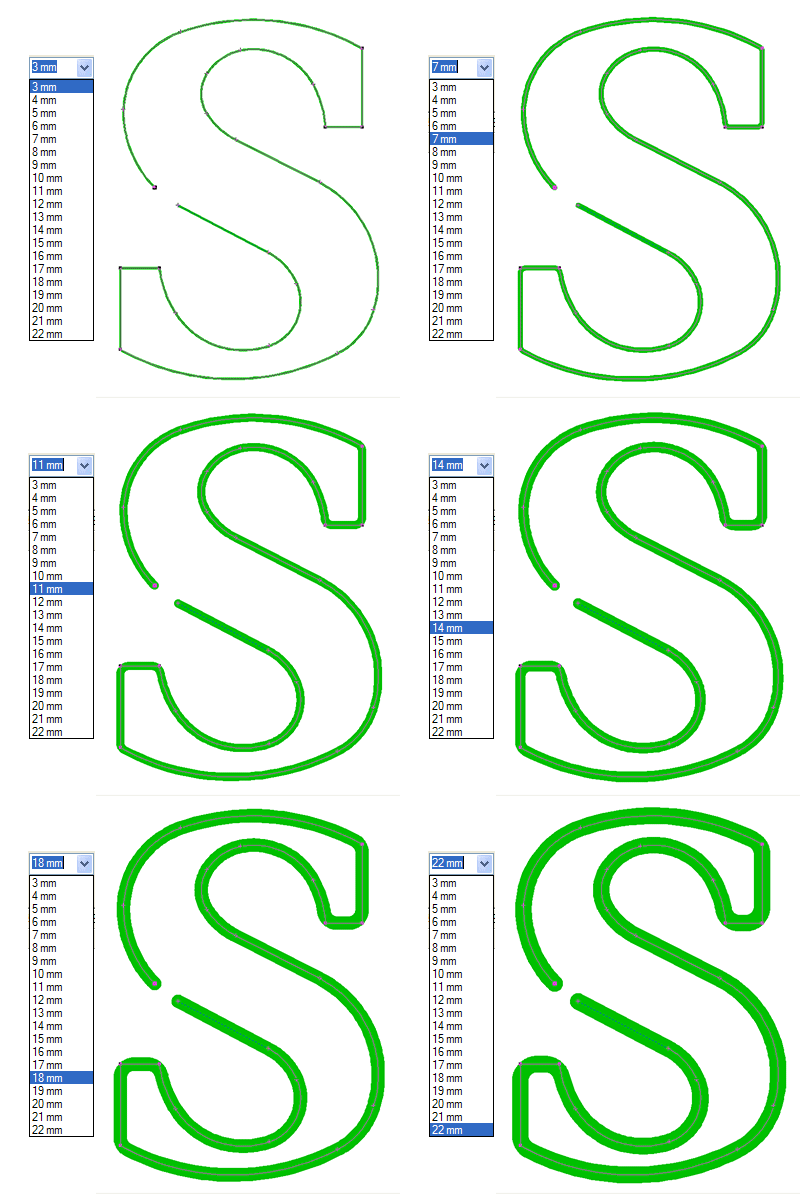
When editing neon tubes, sometimes you need to change the tube diameter only, without changing the design. This is done in one easy step in Neon Wizard. Any subsequent changes that you make to the overall design, including scaling it up or down, will NOT affect the tube diameter - this will stay constant according to the setting you entered. The tube diamaters available go from 3mm to 22mm.
|
|
|
|
|
|
NW |
N+ |
NP |
Connect Tubes
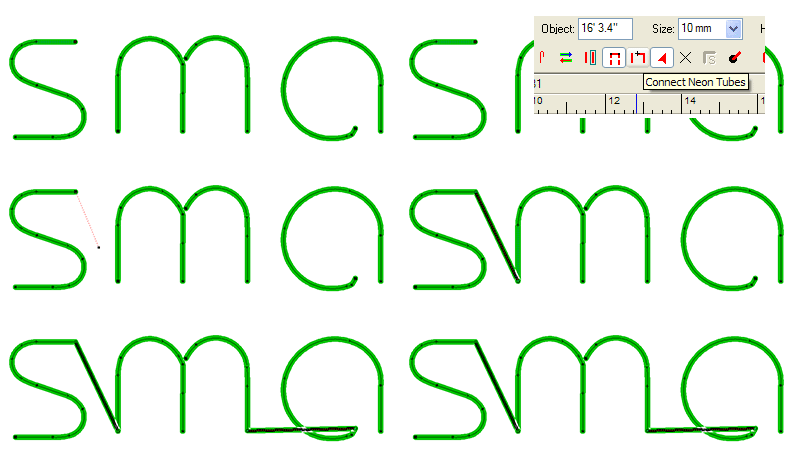
The ability to easily connect neon tubes from different letters or different parts of a design is an important Neon Wizard benefit. This is done in three short mouse operations - click on the end of the first tube, click on the tool, then click on the beginning of the second tube. A new tube will be drawn connecting them that you can then black out. That's it!
|
|
|
|
|
|
NW |
N+ |
NP |
Create Custom Housings
|
|
|
|
|
|
NW |
N+ |
NP |
Current Tube/Total Length Display

One of the most important metrics in a neon design is the amount of glass you are using. Neon Wizard provides a constantly updated measure of tube length - both the current tube that you are working on and the total length of all the tubes in the design.
Use the current tube information to decide where to break a tube, and the total length information for quoting/job costing and as an input to the transformer choice. This is a simple but extraordinarily useful feature!
In 6, the length information is merged with the Neon toolbar into a single property bar that appears as needed, reducing screen clutter dramatically. See also Neon Summary for tube lengths per letter.
|
|
|
|
|
|
NW |
N+ |
NP |
Insert Doublebacks
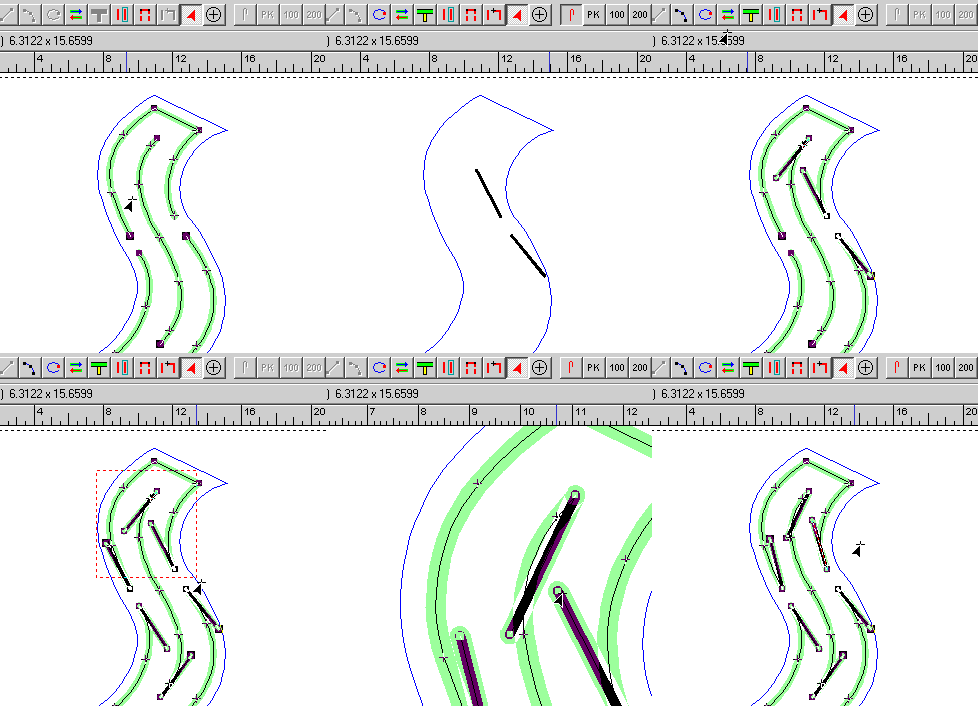
Adding double backs to each termination is a simple neon editing function. You can add the double backs to each termination individually, either using the icon or the pop-up menu for neon editing, or you can add them all terminations at once. A standard length is enforced (default is 3 inches), but you can easily adjust the position.
|
|
|
|
|
|
NW |
N+ |
NP |
Maximum Tube Length
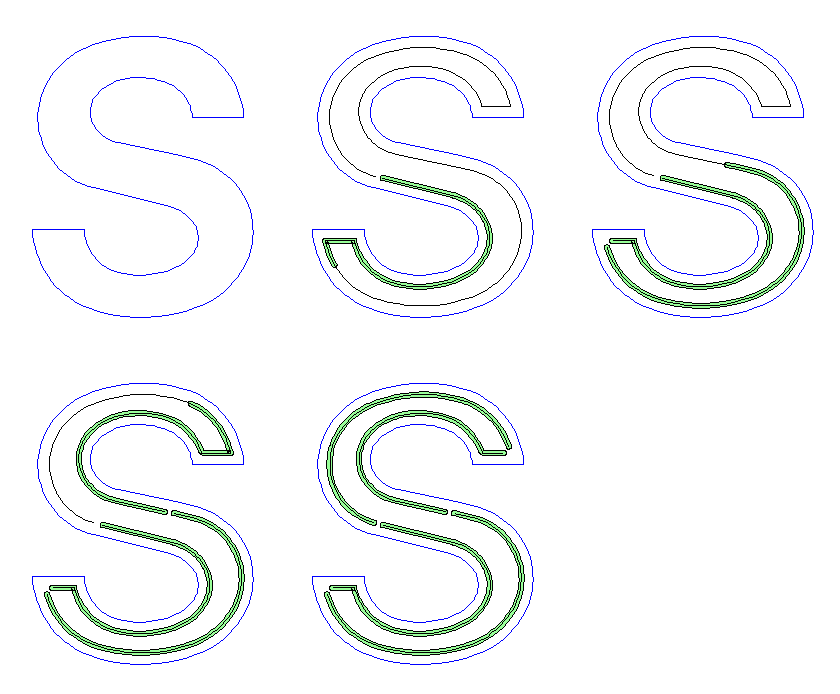
You can now specify the maximum length you want for each tube element in a neon design.
With Limit Tubes to Max Length checked (Tools menu/Options/Neon), for any tube whose length is longer than the setting you have entered (e.g. 96 inches), the first 96 inches are displayed in green and for the rest of the tube only the centerline is shown. You can then double click and select Break Open at the end of the green section (e.g. at 96 inches) or at any point prior to where the green section ends to start the next element ? such as at the last bend. (Breaking the tube at a point less than the full 96 inch length will, of course, make the first tube shorter than 96 inches, but it may be a more practical place for the break - depending on the details of the design.) If the tube is initially more than twice as long as the maximum setting you entered, you can repeat the Break Open process as many times as needed to make all the tubes equal to or shorter than the specified length. If doublebacks are to be added later, their lengths should be subtracted from the Maximum Length setting you enter.
|
|
|
|
|
|
NW |
N+ |
NP |
Move Opening, Break Tube Open
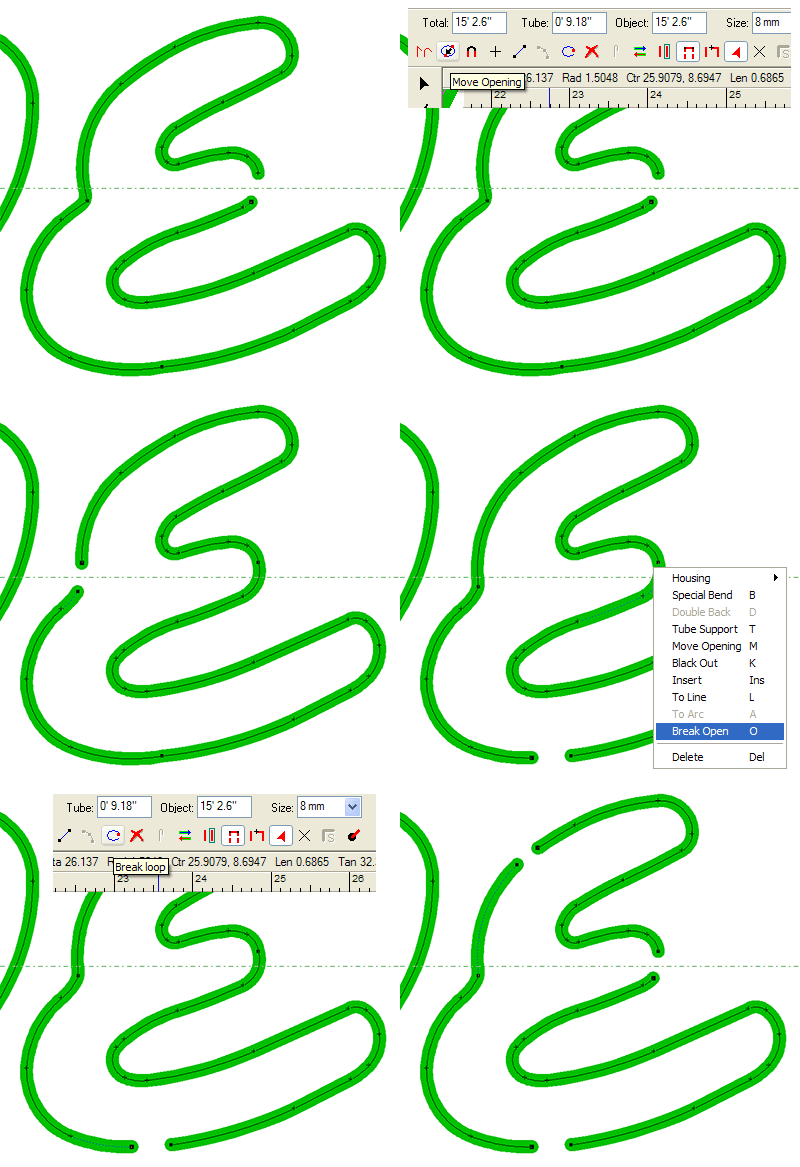
Moving the opening on a neon tube to a new location and breaking the tube open at a certain point are both important neon editing requirements. These capabilities are as simple as clicking on the tube and then clicking on the appropriate icon. You may also select the function from the neon editing pop-up menu. Both options are shown in this example.
|
|
|
|
|
|
NW |
N+ |
NP |
Neonize

\\"Neonize\\" is a term that we came up with to describe converting a regular vector into a neon tube. This feature will instantly make your regular design into a neon design.
Neonize is used mostly to create exposed neon lettering and designs. After you have created the neon tubes, you then add double backs, housings, tube supports, etc. to complete the neon pattern.
|
|
|
|
|
|
NW |
N+ |
NP |
Neon Summary
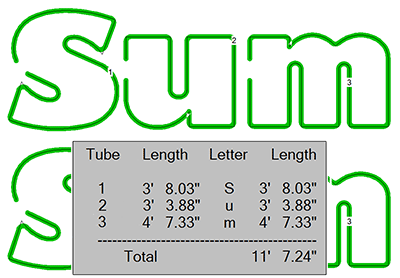
Neon Summary takes the next step in displaying tube length information by presenting a table of tube lengths per letter.
This table is automatically generated and can be printed along with the layout as a proof, internal work order, or customer copy.
The example here shows the letters "Sum" and the associated Neon Summary table showing the individual letter tube lengths and the total length. Note that the tubes are numbered for easy reference on the original neon layout.
|
|
|
|
|
|
NW |
N+ |
NP |
Raceway Support
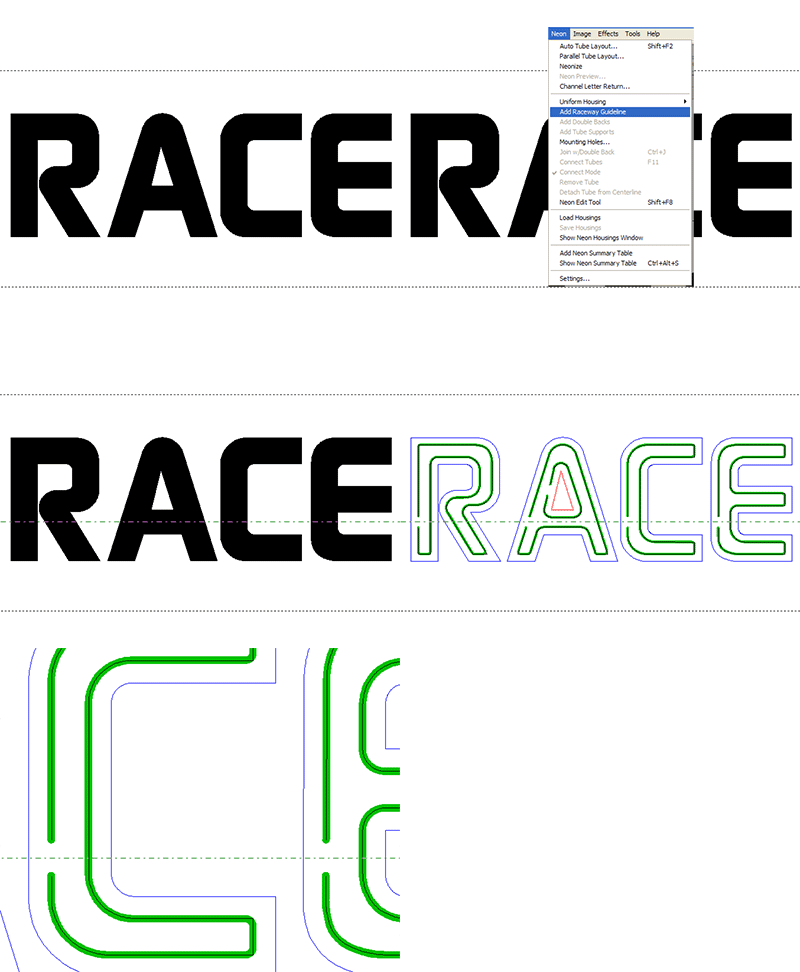
When making channel letters, you often want to line up your neon housings along a raceway. Neon Wizard enables you to position the raceway, and then when you use the Auto Tube Layout or Neonize feature, the tube openings will automatically be created along this raceway guideline.
|
|
|
|
|
|
NW |
N+ |
NP |
Switch between drop/flat blend
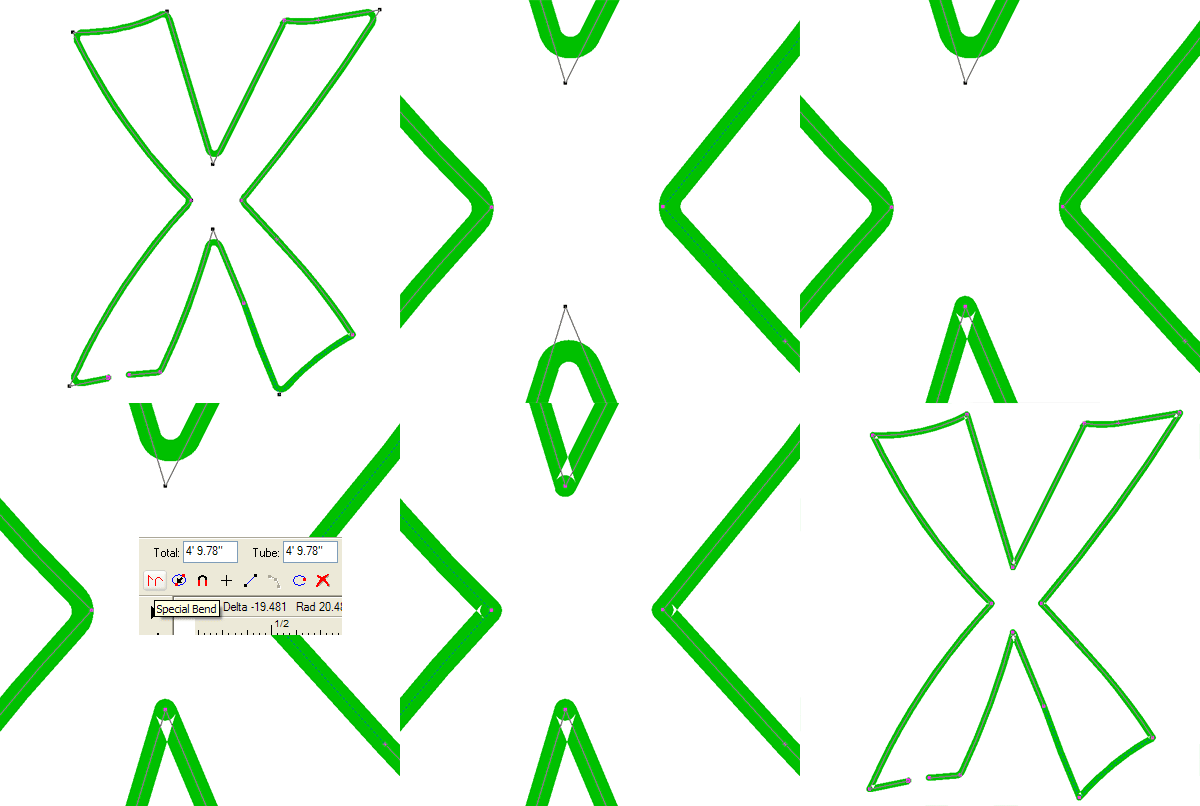
A neon tube bend will be displayed as a flat bend or a drop bend depending on the angle of the two tubes (you set the default angle). You may change any bend from one type to the other just by clicking on the Special Bend icon or by using the neon editing pop-up menu.
|
|
|
|
|
|
NW |
N+ |
NP |
Tube End Gap
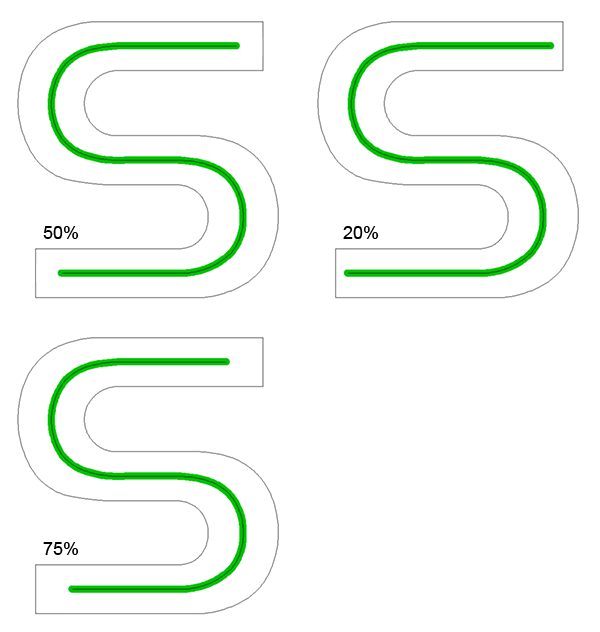
This allows you to set a standard distance from the end of a tube to the inside edge of a channel letter, based on a percentage of the stroke width. The default is 50%, which puts the end of the tube an equal distance from the three edges of the letter. This graphic also shows 20% and 75% for comparison.
|
|
|
|
|
|
NW |
N+ |
NP |
Tube Support Holes
|
|
|
|
|
|
NW |
N+ |
NP |
Neon Auto Tube Count
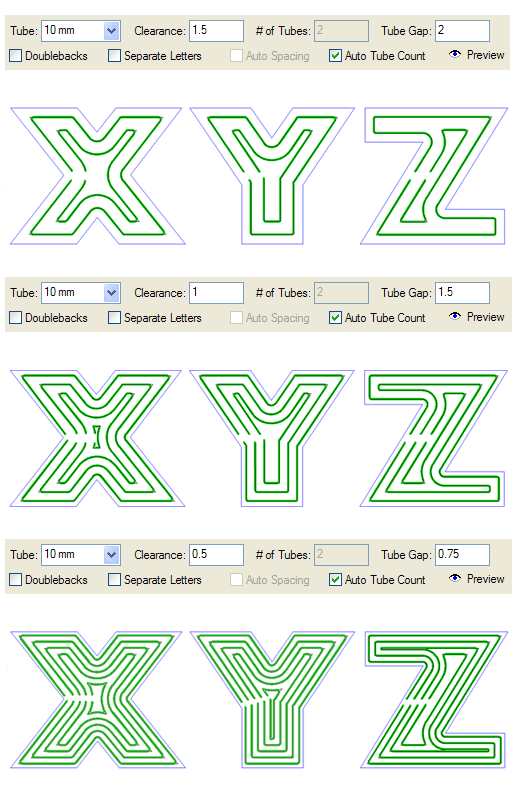
Take the guesswork out of your neon layouts! Auto Tube Count will determine the correct number of tubes based on the Tube Size, Clearance, and Tube Gap values you enter in Auto Tube Layout. These examples show 25" letters with various values and number of tubes.
|
|
|
|
|
|
|
N+ |
NP |
Neon Auto Spacing
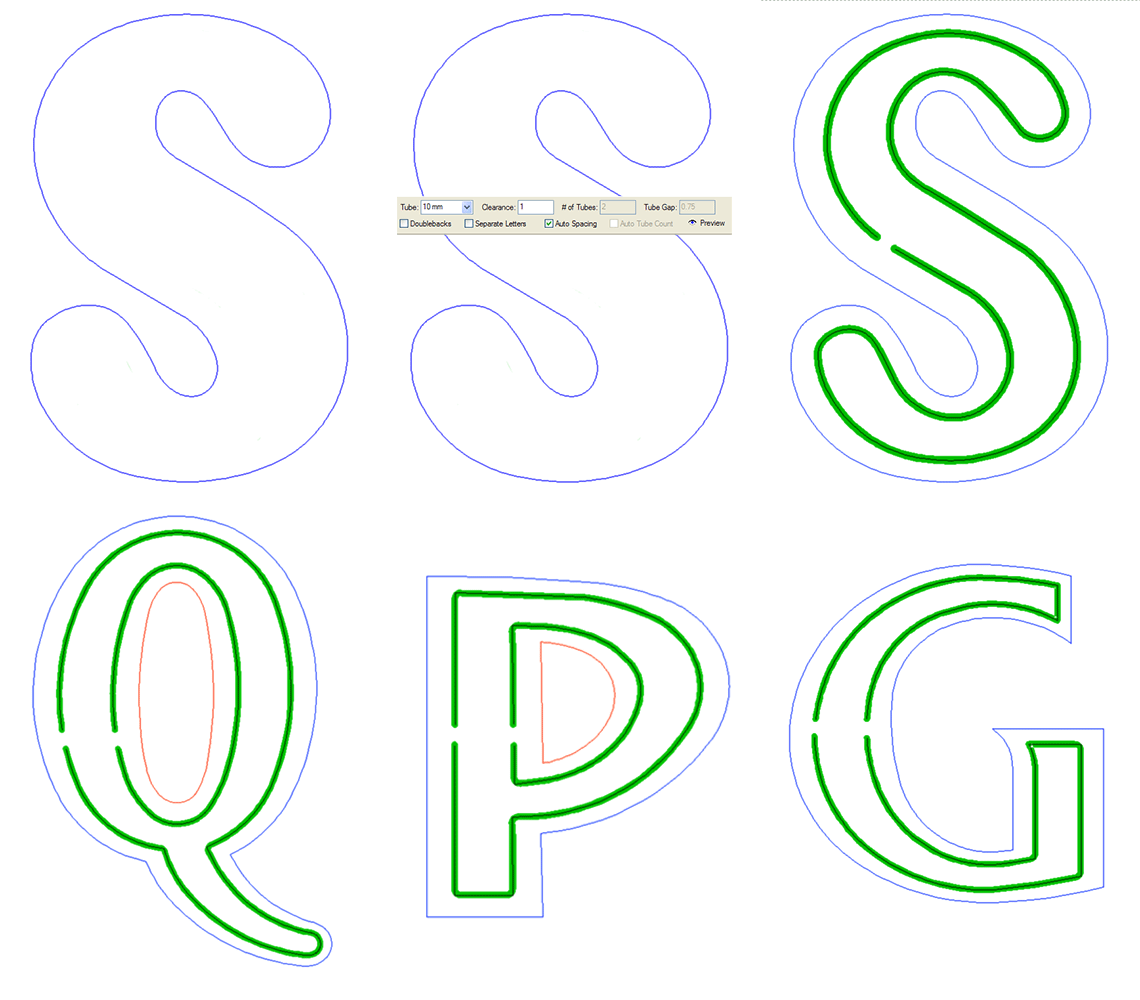
For evenly lighted double tube channel letters, the new Auto Spacing capability with Auto Tube Layout is all you need. For variable stroke letters, the tubes will be placed closer to the edge on the thin strokes and closer to the middle on thick strokes.
|
|
|
|
|
SP |
|
|
NP |
Neon Preview
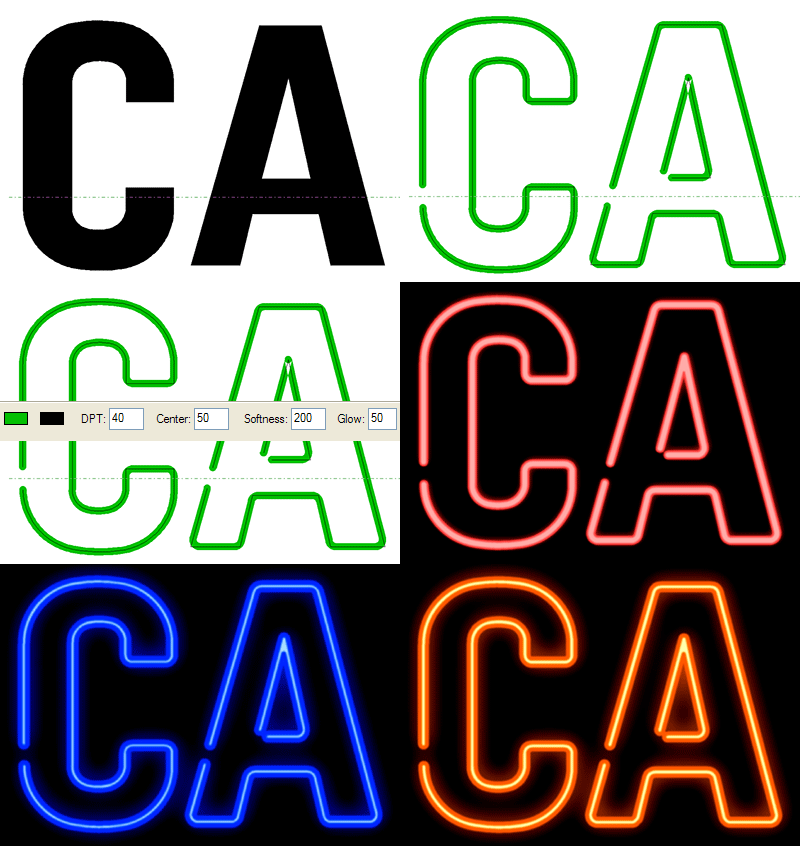
The new Neon Preview gives you amazingly realistic looking previews of what your neon sign will look like. This has been totally redesigned for version 6, and now has several options for fine-tuning the preview. These examples show a few variations on the options, including the Color, Center, Softness, and Glow options in the property bar.
|
|
|
|
|
|
|
|
NP |
Neon Preview enhanced to work with Groups

This enhancement to Neon Preview means you can now preview an entire group of neon graphics.
|
|
|
|
|
|
|
|
NP |
Parallel Tube Layout

Here\\'s a feature that will save you tremendous time and money on big channel letters. Parallel Tube Layout enables you to drop in a whole set of neon tubes inside your letters all at once. You set the angle, the distance from the edge, and the distance between tubes. You can even connect all the tubes together in one easy step. This feature alone more than pays for the software on one big job!
|
|
|
|
|
|
|
|
NP |
Wide Format Printing
|
| |
CMYK and HSV Support
|
SL |
SS |
SA |
SG |
SP |
NW |
N+ |
NP |
New Bitmap Filters: GIF, TIFF LZW
|
SL |
SS |
SA |
SG |
SP |
NW |
N+ |
NP |
Stroke Support
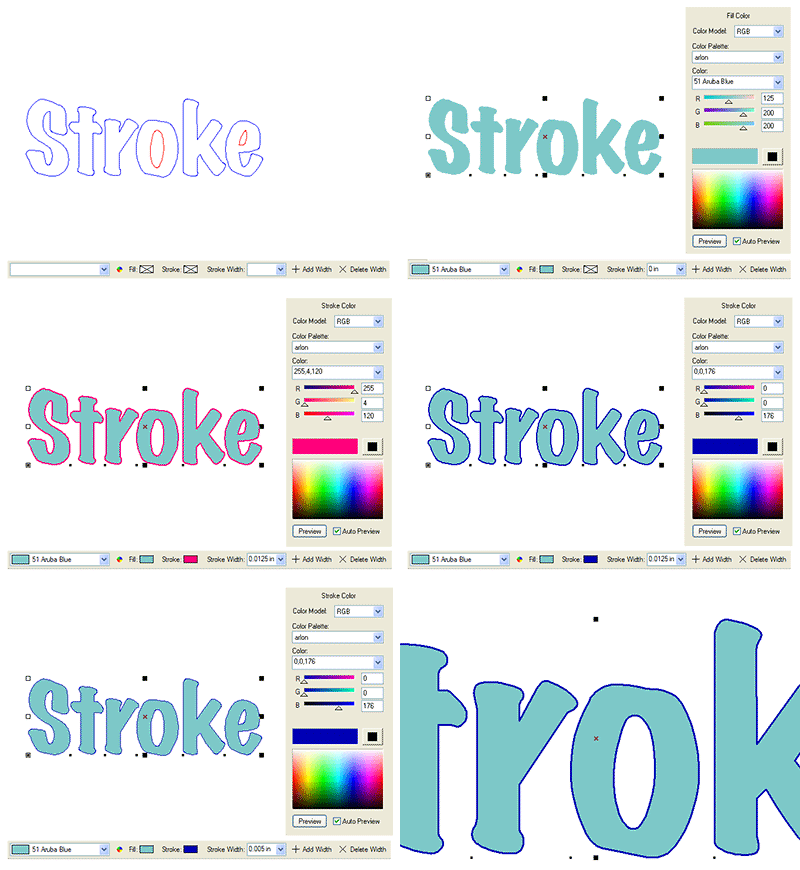
Adding a Stroke to a vector path basically thickens it up for better viewing and printing. This does not change a vector path whatsoever; it is purely a bitmap effect.
In this example, the lettering has been given a stroke, and then the color and width of the stroke are changed using the Job Color Toolbar and the new Color tab.
|
SL |
SS |
SA |
SG |
SP |
NW |
N+ |
NP |
Image Resampling
|
|
|
|
SG |
SP |
|
N+ |
NP |
Windows Image Acquisition
|
|
|
SA |
SG |
SP |
|
N+ |
NP |
External Image Edit
|
|
|
|
SG |
SP |
|
|
NP |
Photomask
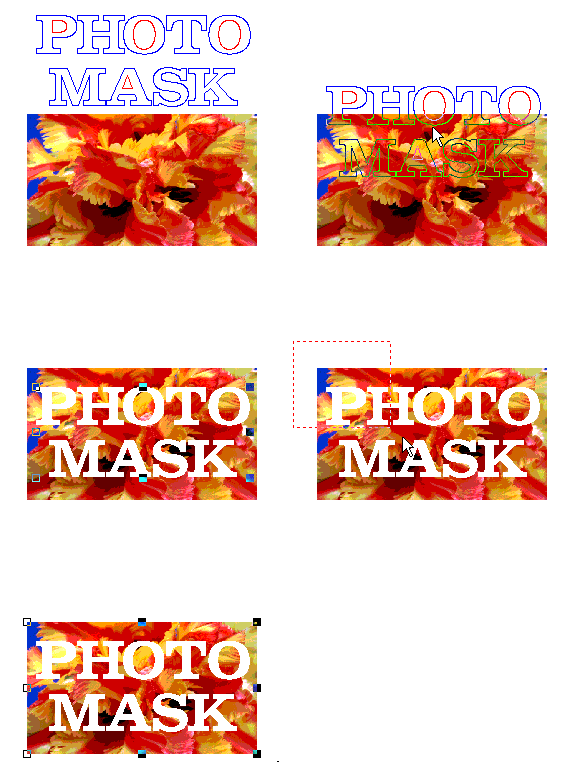
The Photomask feature has been enhanced with a Shift option to more precisely position the underlying bitmap, and a Scale option, allowing you precisely set the size of the bitmap relative to the clipping vector path.
|
|
|
|
|
SP |
|
|
NP |

